Category: PT Corner with Friends

  • Balance Implications For Health and Aging

    Balance Implications For Health and Aging

    by Sarah Apple Kingsley, pt, dpt


    Scientists, physical therapists, and physicians have always known balance to be an important aspect of health. Falls and fall-related injuries, incidences, and hospitalizations account for a major portion of our healthcare expenses. There is now new information that actually confirms that balance is a key proponent of good health and longevity. In a recent study published in the British Journal of Medicine Longevity scientists administered a ten-second balance test to 1,792 people aged 51 to 75.1


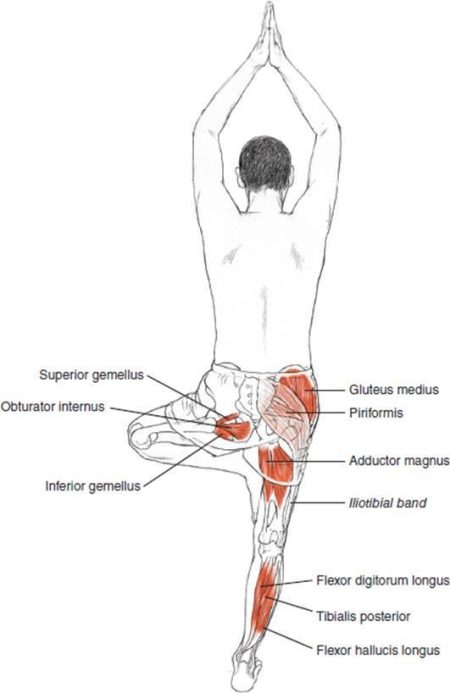
    They coined it the “flamingo test,” with each person asked to stand barefoot on one leg while keeping their other leg lifted in the air. Importantly, they were required to keep their head upright and their arms straight at their sides for ten seconds. This is very similar to tree pose and the knee-to-chest postures we practice in LYT yoga. 


    Twenty percent of the participants wobbled and could not complete the test, especially at the top end of the age bracket. For the 20% of participants who failed the test, there was a higher correlation with being overweight, having heart disease, high blood pressure, poor lipid panels, and these individuals were twice as likely to have Type-2 Diabetes.  


    Subsequent findings that the researchers discovered after checking back in with the participants 7 years later were even more compelling. After accounting for age, gender, and underlying health conditions, the inability to pass the flamingo test was linked to an 84% higher risk of all-cause death* over that seven-year period. In addition to longevity, these researchers contend that balance is necessary for overall health, well-being, and independence.

    * What is all-cause death? Death by multiple causes, or by any cause.


    Balance and its role in optimum health


    When my patients tell me they don’t need to be able to stand on one leg, I quickly respond “Oh yes you do!” We regularly need a one-legged posture to move out of a car or to climb or descend a step or stairs. Simply walking without an assistive device requires a portion of the gait cycle to be in a single-limb stance.


    To lack this ability or have fear of standing on one leg can lead to a loss of autonomy and consequently, less exercise, less movement, and a worsening of various health conditions. Many physical therapists and experts feel balance should be included when checking vital signs. Walking speed has been considered the 6th vital sign, but we should give serious consideration to adding the flamingo test as well!


    If you want to stay active it is paramount that you maintain your physical well-being. When it comes to balance there is definitely some truth in the saying “if you don’t use it, you’ll lose it.” Healthy physical well-being includes strength, flexibility, balance, and effectively using your senses—vision, hearing, feeling physical sensation, etc.


    Balance can be affected by a variety of factors including age, spinal stenosis, pinched nerves, and inner ear issues. If you don’t have any of these issues but still consider yourself to have had poor balance your entire life, THERE IS SOMETHING YOU CAN DO ABOUT IT!


    Easy ways to improve your balance


    The Harvard Medical School newsletter offers some simple advice for improving your balance, including:2


    • Sign up for a balance-focused class (such as tai chi) at your local YMCA or senior center.
    • Walking, biking, and stair climbing all strengthen key balance muscles in the lower body.
    • Stretching loosens tight muscles which can otherwise negatively impact posture and balance.
    • Yoga strengthens and stretches tight muscles while challenging static and dynamic balance.


    The LYT yoga method specifically retrains our core musculature and balance centers, challenging our single-limb stance and causing our bodies to get in touch with new neuromotor pathways that were previously unattainable. Each day with the LYT method is a small improvement toward healthier aging!


    You can also incorporate balance moves into your everyday life. Try standing on one leg while brushing your teeth or getting up from a chair without using your hands. It’s worth the extra effort because the research strongly suggests that better balance now means better quality of life and healthier aging later.


    References:

    1 http://press.psprings.co.uk/bjsm/june/bjsm105360.pdf
    2 https://www.health.harvard.edu/staying-healthy/easy-ways-to-improve-your-balance


  • The 6 and 8 Week Check In: What does it mean for exercise in the postpartum period?

    The 6 and 8 Week Check In: What does it mean for exercise in the postpartum period?

    by Ashley Newton, PT, DPT


    Many people who give birth are ‘cleared’ at either 6 or 8 weeks by their medical provider. However, there is often a lot of confusion about what exactly someone is cleared for at that early postpartum checkup. Many people have questions about when they can resume exercising and often interpret that 6/8 week checkup as the green light to start their pre-partum exercise routine. 


    However, the body has just gone through a multitude of bodily changes associated with pregnancy, labor, and delivery and often needs muscle retraining to be able to exercise safely and without issues that include but are not limited to: pain, urinary leakage, and abdominal separation. Moreover, we know that it is labor itself that is traumatic for the pelvic floor and not the method of delivery (vaginal vs.C-section), meaning that all people who have delivered children have the potential to have pelvic floor issues! 


    The healing process extends well beyond the 6 and 8 week marks, but 

    1) there is often limited guidance on how to approach exercise and 

    2) not everyone gets to see a pelvic floor physical therapist after their pregnancy. 


    So, how do you know if 

    1) the pelvic floor is healthy and 

    2) when to resume exercises? 


    Check out the tips below to self-check your body’s ability to stabilize itself, aka use the deep core and pelvic floor muscles correctly (this is absolutely essential as you start to exercise again!): 


    1) Can you contract, relax, and lengthen the pelvic floor musculature pain-free?
    When the pelvic floor contracts, it should compress and lift. For folks with vaginas: the contraction should feel like picking up a blueberry with the vagina. For folks with penises: the contraction should feel as though the penis is being drawn toward the abdomen. Do the muscles relax after contraction or are they stuck in the contracted position? Can you lengthen the muscles? Many people have trouble differentiating between pelvic floor contraction, relaxation, and elongation but knowing how to perform each of these movements helps to ensure that the pelvic floor is able to do its job well. 


    2) Do you have abdominal coning? 

    Abdominal coning is when the abdomen tents/cones/domes up in the middle with trunk movements. Perform a quick check: In lying with the knees bent, interlace the hands behind the head and lift the head and neck. Does the abdomen dome up or stay flat? If it domes, it means that your body is having trouble managing pressure, aka – the core muscles are not contracting enough and/or at the right time to combat the increase in intra-abdominal pressure when the head and neck lift. This can become an issue when we move as we need good pressure management to move pain-free and prevent issues such as urinary leakage and pelvic organ prolapse. 


    3) Are you able to perform a single-leg balance for at least 30 seconds? 

    If you are unable to, your body may be having trouble stabilizing with its deep core muscles. Over time, this can lead to overloading of other tissues and subsequent pain. 


    These are just a couple of things you can do to begin to self-assess the quality of your movement and start asking more questions regarding pelvic health and wellness in the post-partum period. If this self-check-in created more questions than it answered, it may be helpful to contact a pelvic health physical therapist in your area in order to determine what areas would be helpful to work on in order to optimize your health in the postpartum period and beyond! Check out pelvicrehab.com to find practitioners in your area or come see me in Princeton, NJ!


  • How to Have a Happy Low Back – Part 2

    How to Have a Happy Low Back – Part 2

    by Thalia Wynne, PT, DPT, AT, RYT-200 


    Welcome to part two of the three-part How to Have a Happy Low Back series! If you haven’t had a chance to check out part one, I highly encourage you to start there or read it after you finish this article. Remember that what our low back truly desires is to have three things: stability, mobility, and adaptability. 


    Low back pain can be a major cause of distress. It is not uncommon for those who have experienced intense episodes of low back pain to develop, what we call in physical therapy, fear-avoidance to movement. Often someone will come to me expressing their fear to do simple tasks like picking up a pen from the floor or bringing in groceries from the car. Low back pain can be debilitating and is commonly linked with increased rates of depression and reduced quality of life. Utilize the three principles of stability, mobility, and adaptability combined with a proactive, healthy lifestyle and your back will no longer feel like a trouble area. Rather it will feel happy and free, allowing you the peace of mind to pursue any hobby, dream, or special activity to the fullest extent of your desires. Please understand that these are general principles and guidelines. To truly maximize your potential of applying them seek out a personalized training plan from your local physical therapist and other healthcare and fitness professionals. 


    Let’s dive into our second principle, mobility (stability is covered in Part 1 of this series). The definition of mobility is to move or be moved freely and easily. This means without difficulty and without pain. Movement comes from joints – the point where two bones make contact. Muscles contract and relax to move joints. Our nervous system, run by the brain, gives the command to our muscles to move or be still. The lumbar spine has on average, the following ranges of motion (in degrees). Notice that the lumbar spine primarily assists with spinal flexion and extension (sagittal plane or forward/backward movement) compared to the other motion types available to it. 

    Flexion 40-50º
    Extension 15-20º
    Rotation 5-7º 

    Lateral Flexion (side bending)

    20º


    spine-anatomy-basic-spine-2009-16-638

    Common barriers to full range of motion include joint restriction, muscle restriction, and motor coordination deficits. An example of each respectively include osteoarthritis, shortened muscle tissue from poor posture habits, and excessive movement from one segment – most commonly the L5-S1 segment vs uniform flexion-extension throughout the entire lumbar spine, L1-S1, due to learned poor motor behaviors and postural deficits. 


    Most often, extension is the first motion to be negatively affected. From the time we are born, we know the effects of gravity. Gravity pushes us into flexion, and over time we find ourselves slouching over computers, slumped on comfy couches, spending our days in flexed positions, thanks to gravity’s pull. Without training, over time we lose our ability to go into full lumbar extension. That loss of extension means that the balance of our gloriously complex musculoskeletal system is thrown off, leading to undue wear and tear. Imagine the gears of your bike were constantly rubbing in places they shouldn’t. Metal breaks down, gears get stuck, and seemingly overnight, the wheel doesn’t turn like it used to. But this wasn’t an overnight issue. It was years of breakdown because the gears were never addressed. This is what happens to the structures in your body. The seemingly sudden incident that throws out your back – waking up from sleep in sudden pain, sharp shooting agony after picking up a light bag from the floor – is really just the final straw to an issue that was building up for a very long time. 


    Issues like this can often be avoided with appropriate movement and posture education, training mobility, and most importantly adopting an overall healthy lifestyle. There is no easy fix to our orthopedic pains, unfortunately. As nonchalantly as medical providers offer us pills and creams to make our pain go away, these are only temporary relief aids to issues that only YOU have the power to heal. Our life choices affect our every cell. It’s true what they say – you are what you eat, and you are what you do. Isn’t it joyous to know that you have the power to change your own life? So, choose food, drink, movement, and stress reduction habits that will support your well-being and minimize your chances of developing avoidable chronic diseases, such as low back pain. 


    In summary, our lumbar spine moves in 3 planes of motion, but mostly it is responsible for flexion and extension. Over time, extension tends to be the primary motion of the lumbar spine that becomes limited due to gravity’s pull biasing flexion. To avoid losing extension, or any other motion of the lumbar spine, you can 1) educate yourself on appropriate posture and movement mechanics for your activities of daily living, 2) train mobility, and 3) support your movement practice with other healthy lifestyle choices. The LYT Daily platform is full of classes to support your lumbar spine mobility. Try one of these below and see for yourself! Your back will thank you. 


    1. LOW BACK MOBILITY | Beginner | with Kristin
    2. Better Backbending – A LYT Yoga® Workshop | with Lara


    Until next time, cheers to a happy low back! 


    XO, 

    Thalia Wynne, PT, DPT, AT, RYT-200 

    @thalialovee


    Picture source: https://www.themanualtherapist.com/2016/01/top-5-fridays-5-myths-about-spinal.html 

  • Exercise and Pelvic Organ Prolapse

    Exercise and Pelvic Organ Prolapse

    by Dr. Ashley Newton PT, DPT


    Pelvic organ prolapse occurs when the pelvic area does not adequately support the pelvic organs above. The ability to support is based on connective tissue, nerve functioning, and pelvic floor and core muscle strength and coordination. Pelvic organ prolapse can often create bothersome symptoms for people including heaviness in the pelvis, low back and pelvic pain, difficulty emptying with urination, and bulging at the vaginal opening. Oftentimes, people with pelvic organ prolapse are nervous about how and if they can participate in exercise. The answer is resoundingly yes! Specific exercise and pelvic floor training can help reduce and manage the symptoms of pelvic organ prolapse. However, there are a few things to consider and keep an eye out for when exercising to avoid exacerbation of symptoms.


    1. With lifting: Always lift with a neutral spine and get the object close to your body. Rounding the back and head places downward pressure on the pelvic organs. When the back and head are neutral, we are better able to use the core and pelvic floor and the deep core musculature is able to support the pelvic organs. 
    2. Avoid holding your breath: Think about it this way – if you hold your breath, you hold all that pressure and air in your body. That pressure is pressing down on the pelvic organs!! Keep breathing through exercise and if you find that you are tempted to hold your breath, try modifying the exercise or pose. 
    3. Modify high-impact activities: Plyometrics (jumping), running, etc. – result in increased load on our bodies. When we run, our body absorbs 2-4x the body’s weight as force. That is a lot for the body to manage and if the body is already having trouble supporting pelvic organs with lighter activities, it can make symptoms worse. Lower impact activities reduce the stress on the core and pelvic floor and also give people the opportunity to slow down and focus on their posture. 
    4. POSTURE, POSTURE, POSTURE: I can’t say it enough! Your skull should be stacked over your rib cage over your pelvis. This optimizes how our tissues and muscles co-contract to support the spine. In this posture, we avoid pressuring the pelvis and can lift and support the pelvic organs better. 
    5. Don’t ignore your shoulder girdle!!! Your shoulder girdle is part of your core. It is what allows the rib cage to sit over the pelvis. Those muscles need strengthening so that we can keep the trunk upright throughout the day without rounding and pressurizing into the pelvic floor. 


    As always, if you have questions regarding pelvic health, exercise, and/or pelvic organ prolapse specifically, it may be helpful to contact a pelvic health professional (i.e. physician, pelvic health physical therapist) for clarity and information. Check out my clinic’s Instagram @activcoreprinceton_pelvic for all things pelvic health and check out pelvic PTs in your area. Pelvicrehab.com is a directory of pelvic rehab practitioners searchable by zip code!

  • How to Have a Happy Low Back – Part 1

    How to Have a Happy Low Back – Part 1

    by Thalia Wynne, PT, DPT, AT, RYT-200 


    The lumbar spine consists of 5 vertebrae and is surrounded by layers of muscle and connective tissue. Encapsulated by layers of fascia, the lumbar spine is the home of the energetic hub of our central nervous system – the spinal cord. This wonderful playground of tissue and bone gives us the capacity to move in a variety of ways and remain upright when we want to be. Unfortunately, low back pain is a major issue in our world, and we spend millions of dollars a year trying to figure out how to keep our lumbar playground from becoming a garbage pit of pain, dysfunction, and inflammation. 

    Yoga for Increased Stability

    So, how do you have a happy low back? We give it what it craves! Stability, mobility, and adaptability. Many chronic lumbar conditions are easily preventable through proactive healthy lifestyle changes that include a daily movement practice, healthy food and drink choices, and stress management. Each month, in a series of three articles, you are going to learn what to do to develop a stable, mobile, and adaptable spine with yoga so you can live a happy, back-pain free life! 


    Let’s dive in with a chat about stability. The definition of stability is the state of being firmly fixed. Our lumbar spine gains stability through the natural shape of its vertebrae, with a thick and massive vertebral body. These large structures were designed to hold the weight of our entire upper body. The lumbar spine can handle a lot of force because of its natural anatomy. The 5th lumbar vertebra attaches to the sacrum. Through the stability of the sacrum, weight is transferred from the spine to the pelvis. The bony structures of the lumbar spine are supported by joints, discs, ligaments, tendons, muscles, and fascia.  


    When all these players are doing their roles, we have structural integrity. Forces get dispersed evenly, and energy flows easily. This is why POSTURE *#*^ing MATTERS. We must train our muscles to align our joints to their anatomical positions. Gravity wants to pull us down. Because of our modern lifestyles – sitting in school, working at a desk, looking at our phones, less time playing and exploring – we are vulnerable to unintentionally developing poor postural habits that take us out of our anatomical alignment because of the way gravity pulls on us when we slouch. This malalignment shows up as adaptive muscle weakness, tightness, and, over time, joint and bone degeneration, spinal compression, nerve irritation, and duh duh duh – pain. The good news is most of the time, we can reverse the pain through movement practices that bring us back to anatomical alignment. 


    LYT yoga is a wonderful practice for this very reason. If you practice with us, you already know how intentional every pose and transition is to keep optimal posture. Don’t be fooled – it is a PRACTICE. You will feel better after one class certainly but having a happy back takes time and effort. Think of the many years it took to develop the weakness and tightness in your body. Be consistent with your posture work to rewire your brain and increase muscle strength and flexibility to undo the years of poor movement and open up the energetic freeway between your pelvis and spine for a happy, healthy, and stable low back. 


    Try our LYT Daily posture challenge

    posture challenge day 1


    and check out this month’s latest workshop from Lara – Love for The Low Back

    Love for the low back


    to get started on your posture journey to stabilize your lumbar spine today! 


    XO, 

    Thalia Wynne, PT, DPT, AT, RYT-200 

    @thalialovee

  • Rheumatoid Arthritis

    Rheumatoid Arthritis

    by Sarah Apple Kingsley, pt, dpt


    Rheumatoid arthritis (RA) is a chronic autoimmune inflammatory disorder that can not only affect your joints but many other body systems as well. RA can cause a wide variety of symptoms, impacting the lungs, skin, kidneys, eyes, heart, bone marrow and blood vessels. Unlike osteoarthritis, which is caused from typical wear and tear to the bones and joints, RA differs in that your immune system is attacking its own body tissues and joint lining. This leads to painful swelling and eventually bone deformity. The inflammation can then spread to other areas of the body causing further disability.


    Symptoms of RA include weak, warm and swollen joints, joint stiffness that is usually worse in the mornings or after periods of inactivity, fatigue, fever and loss of appetite. RA usually impacts smaller joints first, especially the hands, fingers, toes and feet. As the disease advances it impacts larger joints in the body such as the shoulders, hips, knees, ankles and elbows. Symptoms can vary in frequency and intensity, with individuals usually experiencing “flare ups” when inflammatory symptoms return followed by periods of relative remission. Over time the bones and joints can become deformed with nearly permanent changes, particularly affecting the hands such as a shift in the way the fingers line up called a Boutonniere deformity.


    Typical treatment options include a series of anti-inflammatories both steroidal and non steroidal in nature and in severe cases surgical treatment is indicated. However, these medications can cause long term damage to your organs and possibly thwart your body’s natural inflammatory healing response to other diseases and infections. Identifying your body’s personal triggers that contribute to immune flare-ups is key for keeping your symptoms at bay. Many of my patients, clients, family and friends have found that gluten, dairy, and sugar or foods high in added sugar content can lead to increased inflammation. One nutrition tip to consider: Parsley contains a potent compound called carnosol that specifically targets the inflammation often caused by Rheumatoid Arthritis! Add it to juices, smoothies, lunches and dinner wherever you can!


    Another beneficial and unfortunately less prescribed option (other than post-surgery) is physical and occupational therapy! Our bones and joints stiffen and weaken based on the stresses we are or are not putting on them. Positive movement and mobility at each joint structure as well as releasing the fascial restrictions throughout the body can be very helpful, especially since this is a systemic disorder involving the whole body’s inflammatory response. 


    It is important to be aware of the good stress/bad stress scenario. The body can easily go back into a heightened sympathetic fight or flight pain response state when overstressed, so it is paramount to keep movement and mobility in smaller pain free ranges, gradually increasing tolerance. Working on movement, especially during periods of remission as opposed to flare ups, is also something important to consider. 


    Opening and closing of the fists, hand and fingers at each digit, performing exercises utilizing putty or sand to get textured proprioceptive feedback stimulus through the hands, and performing nerve glide exercises can all be helpful. Strengthening the scapular stabilizers and shoulder girdle and opening of the chest spaces will also help to decrease the load and strain put on the hands with increased activity. My favorite nerve glide is the “busy bee”:


    Bring your hands to a prayer position, palms together with elbows wide. Keep your palms together as you wiggle your hands left and right (sort of like the genie in a bottle dance), bringing your hands up overhead as high as possible without pain or separating the palms. Return back down to the starting position and repeat 10 times. 


    Seeking out a good PT, OT or myofascial release therapist are great options to help improve your symptoms during both periods of flare ups and remission. Also check out the LYT daily platform for other exercise ideas targeting the wrist, hands, and opening of the joint spaces and fascial lines to help with long term movement and mobility maintenance. 


    References:


    https://www.mayoclinic.org/diseases-conditions/rheumatoid-arthritis/symptoms-causes/syc-20353648

  • To Kegel or Not to Kegel

    To Kegel or Not to Kegel

    By Dr. Ashley Newton, PT, DPT


    Intra-abdominal pressure is the pressure within the abdominal cavity created by the interaction between the abdominal wall and organs. This pressure changes with breathing and the resistance from the abdominal wall. When you are lifting an object or even lifting a limb, you increase intra-abdominal pressure. 


    The coordination of the diaphragm, abdominals, and pelvic floor musculature works to support the pelvic contents during changes in intra-abdominal pressure. However, if the synergy between these muscles is compromised, they are unable to optimally support the abdominal organs. This results in excessive pressure placed on the back, pelvic organs, and pelvic floor. Problematic issues that could arise include urinary incontinence, pelvic organ prolapse, back pain, and diastasis recti. 


    So how do you know if your body is handling pressure well? How do you avoid putting undue pressure on your abdominal organs and pelvic floor? 


    It all begins with breathing. Our abdominal cavity is capped at the top by the thoracic diaphragm and capped at the bottom by the pelvic floor musculature. This creates what is referred to as the “core canister.” When we breathe, the pelvic floor and thoracic diaphragm move down and up together like a piston. If this movement is restricted by fascial tightness, weakened, and/or moves in the opposite direction, the pelvic floor and thoracic diaphragm are compromised in their ability to support the abdominal contents. 


    Here’s a breathing exercise that can help you check in on your coordination:


    1. Begin in a seated position. Align your skull, scapula, and sacrum.
    2. Make sure you are sitting evenly on your SIT bones.
    3. Bring your tongue to the back of your top teeth and imagine you are pressing a small raspberry against the top of your mouth.
    4. Place your hands on the sides of your ribs.
    5. Inhale through your nose and think about widening the ribs into your hands. Imagine an umbrella opening, expanding your chest gently.
    6. Exhale slowly through your mouth and imagine “fogging glass” as you exhale.
    7. Keep your belly soft as you exhale. Squeezing the belly can create excess pressure on the pelvic floor and abdominal organs.
    8. Repeat the exercise 5 times.


    Breathing works your core muscles and it is the foundation of managing your intra-abdominal pressure. Whenever lifting objects, you do not hold your breath! This creates increased pressure on the abdominal contents, pelvic floor, and heart, which can be dangerous. Always keep breathing while you are lifting in order to prevent an unhealthy increase in pressure on your musculature and organs. 


    Good lifting mechanics and upright posture help optimize the functioning of your core canister. These techniques can also enhance your ability to manage changes in pressure in your body. With a strong core and healthy breathing habits, your body is able to stabilize your spine and better protect you from injuries.

  • Peach Season: Your End of Summer Glute Daily Yoga Guide

    Peach Season: Your End of Summer Glute Daily Yoga Guide

    Your End of Summer Glute Daily Yoga Guide

    by Thalia Wynna, PT, DPT, AT, RYT-200


    PEACH SEASON: YOUR END OF SUMMER GLUTE DAILY YOGA GUIDE 

    Ever wonder why world-class athletes have aesthetically pleasing donks? They aren’t for show, that’s for sure. World class athletes like Serena Williams put their glutes to work! And you should too. Read on to learn about this powerful muscle group and what you can do to protect the function of your peach. 

    Anatomy Class

    Let’s start with an anatomy lesson. What are the glutes? The glutes are composed of three different muscles: gluteus maximus, gluteus medius, and gluteus minimus. They attach from the pelvis and sacrum to the femur. They each have special roles to play in helping us move efficiently. 

    Gluteus maximus is responsible for hip extension and external rotation (fig B). It also helps keep your trunk upright. Hence why the gluteus maximus is a posture muscle. It keeps you erect and works to propel you forward when you walk, climb stairs, stand up from a chair, etc. 

    Gluteus medius and minimus abduct and internally rotate the hip. It also keeps the pelvis level when you are standing on one leg (fig C). It is integral to help avoid hip drop and maintain your balance while walking, running, and hitting tree pose with grace and poise. 

    your-end-of-summer-glute-guide-daily-yoga-online-yoga-1

    When your glute muscles are weak, a common issue in many – especially those that sit for most of the day and live sedentary lifestyles – it can lead to a cascade of problems. All the motions that these muscles are responsible for coordinating become imbalanced. The hip and knee joint movements are altered, and other muscles and body regions try to compensate for the lack of work done by the glutes – most commonly the quadriceps and back muscles. These muscles become overworked, movements become dysfunctional, and joint, muscle, or tendon breakdown begins to occur. Diagnoses are given such as patellofemoral pain syndrome, greater trochanteric bursitis, hip and knee osteoarthritis, lumbar radiculopathy, chronic low back pain, hip flexor tendinopathy, IT band syndrome, piriformis syndrome, gluteal tendinopathy, even recurrent ankle sprains. All these diagnoses and more can boil down to poor glute activation. In turn, having great glute activation and strength can aid you in your ability to avoid chronic injury, move more efficiently in your everyday life, and compete powerfully like Serena Williams ;). If you are a LYT subscriber, count yourself lucky because we activate your glutes at the beginning of every single class during The Reset. One way to strengthen your glutes is by participating in strength training 2-3x per week. According to a study in the Journal of Sports Science and Medicine, the following exercises are great gluteus maximus burners1 (classified as >60% of MVIC: max voluntary isometric contraction): 

    • Step-up
    • lateral step-up,
    • diagonal step-up
    • crossover step-up
    • hex bar deadlift
    • rotational barbell hip thrust
    • traditional barbell hip thrust
    • American barbell hip thrust
    • belt squat
    • split squat
    • in-line lunge
    • traditional lunge
    • pull barbell hip thrust
    • modified single-leg squat
    • conventional deadlift
    • band hip thrust.


    Always remember, your strength gains are only as good as your ability to move through the strength exercises with great form and appropriate muscle activation. This is why a yoga practice like LYT is a fantastic way to check in with your movement patterns and glute activation potential every week to ensure you are moving in the most optimal ways. Give some love to your glutes by committing to a consistent yoga practice and strength routine. Check out Lara’s workshop dedicated to glutes here. Then, give the gift of a juicy peach to someone you love by referring them to a 2-week free trial on LYT daily yoga. We would love to see you there. 


    Happy Peach Season!  

    XO, 

    Thalia Wynne, PT, DPT, AT, RYT-200 

    @thalialovee 

    your-end-of-summer-glute-guide-daily-yoga-online-yoga-2your-end-of-summer-glute-guide-daily-yoga-online-yoga-3

    Figure B: Gluteus maximus, hip extension 

    Figure C: Gluteus medius in tree pose 

    Resources: 

    1. Neto WK, Soares EG, Vieira TL, et al. Gluteus Maximus Activation during Common Strength and Hypertrophy Exercises: A Systematic Review. J Sports Sci Med. 2020;19(1):195-203. Published 2020 Feb 24.

    Picture sources: 

    Fig B: https://us.humankinetics.com/blogs/excerpt/learn-this-exercise-bridge-with-leg-kick

    Fig C: https://doctorlib.info/anatomy/yoga-anatomy/7.html