Category: PT Corner with Kristin Williams

  • Groin Strain

    Groin Strain

    I always feel a little sick to my stomach when one of my kids texts me from their various sporting activities and it says, “Mom, I hurt my (fill in the blank)”. In my profession, I have seen some crazy injuries over the years and unfortunately, I am a worry wart by nature. Bad combo! So earlier this week, I got a text from Bailey towards the end of the competitive cheer practice, “Mom, I hurt my leg” and, of course, my mind went to the worst case scenario like ACL tear or fracture. When I asked what happened she replied, “I don’t know. I was doing jumps and then I pulled something where my thigh meets my pubic bone.” Of course she didn’t say “pubic bone”, so after I laughed out loud, I sighed in relief that it sounded like a groin strain and nothing more. 


    Muscle strains are the number one injury in athletes, accounting for up to 31% of doctor visits. A groin strain, which is a strain to the adductor muscle group, is common, especially among soccer and hockey players. Other sports where we might see them include football, basketball, tennis, figure skating, baseball, horseback riding, karate, softball, and yes, cheerleading. Suddenly accelerating while sprinting is the most common cause of a groin strain, but sudden changes in direction while running also put exaggerated strain on the tendon. Finally, jumping and overstretching the adductor tendon is less common, but can occur as well, as was the case with Bailey.

    groin_strain_1


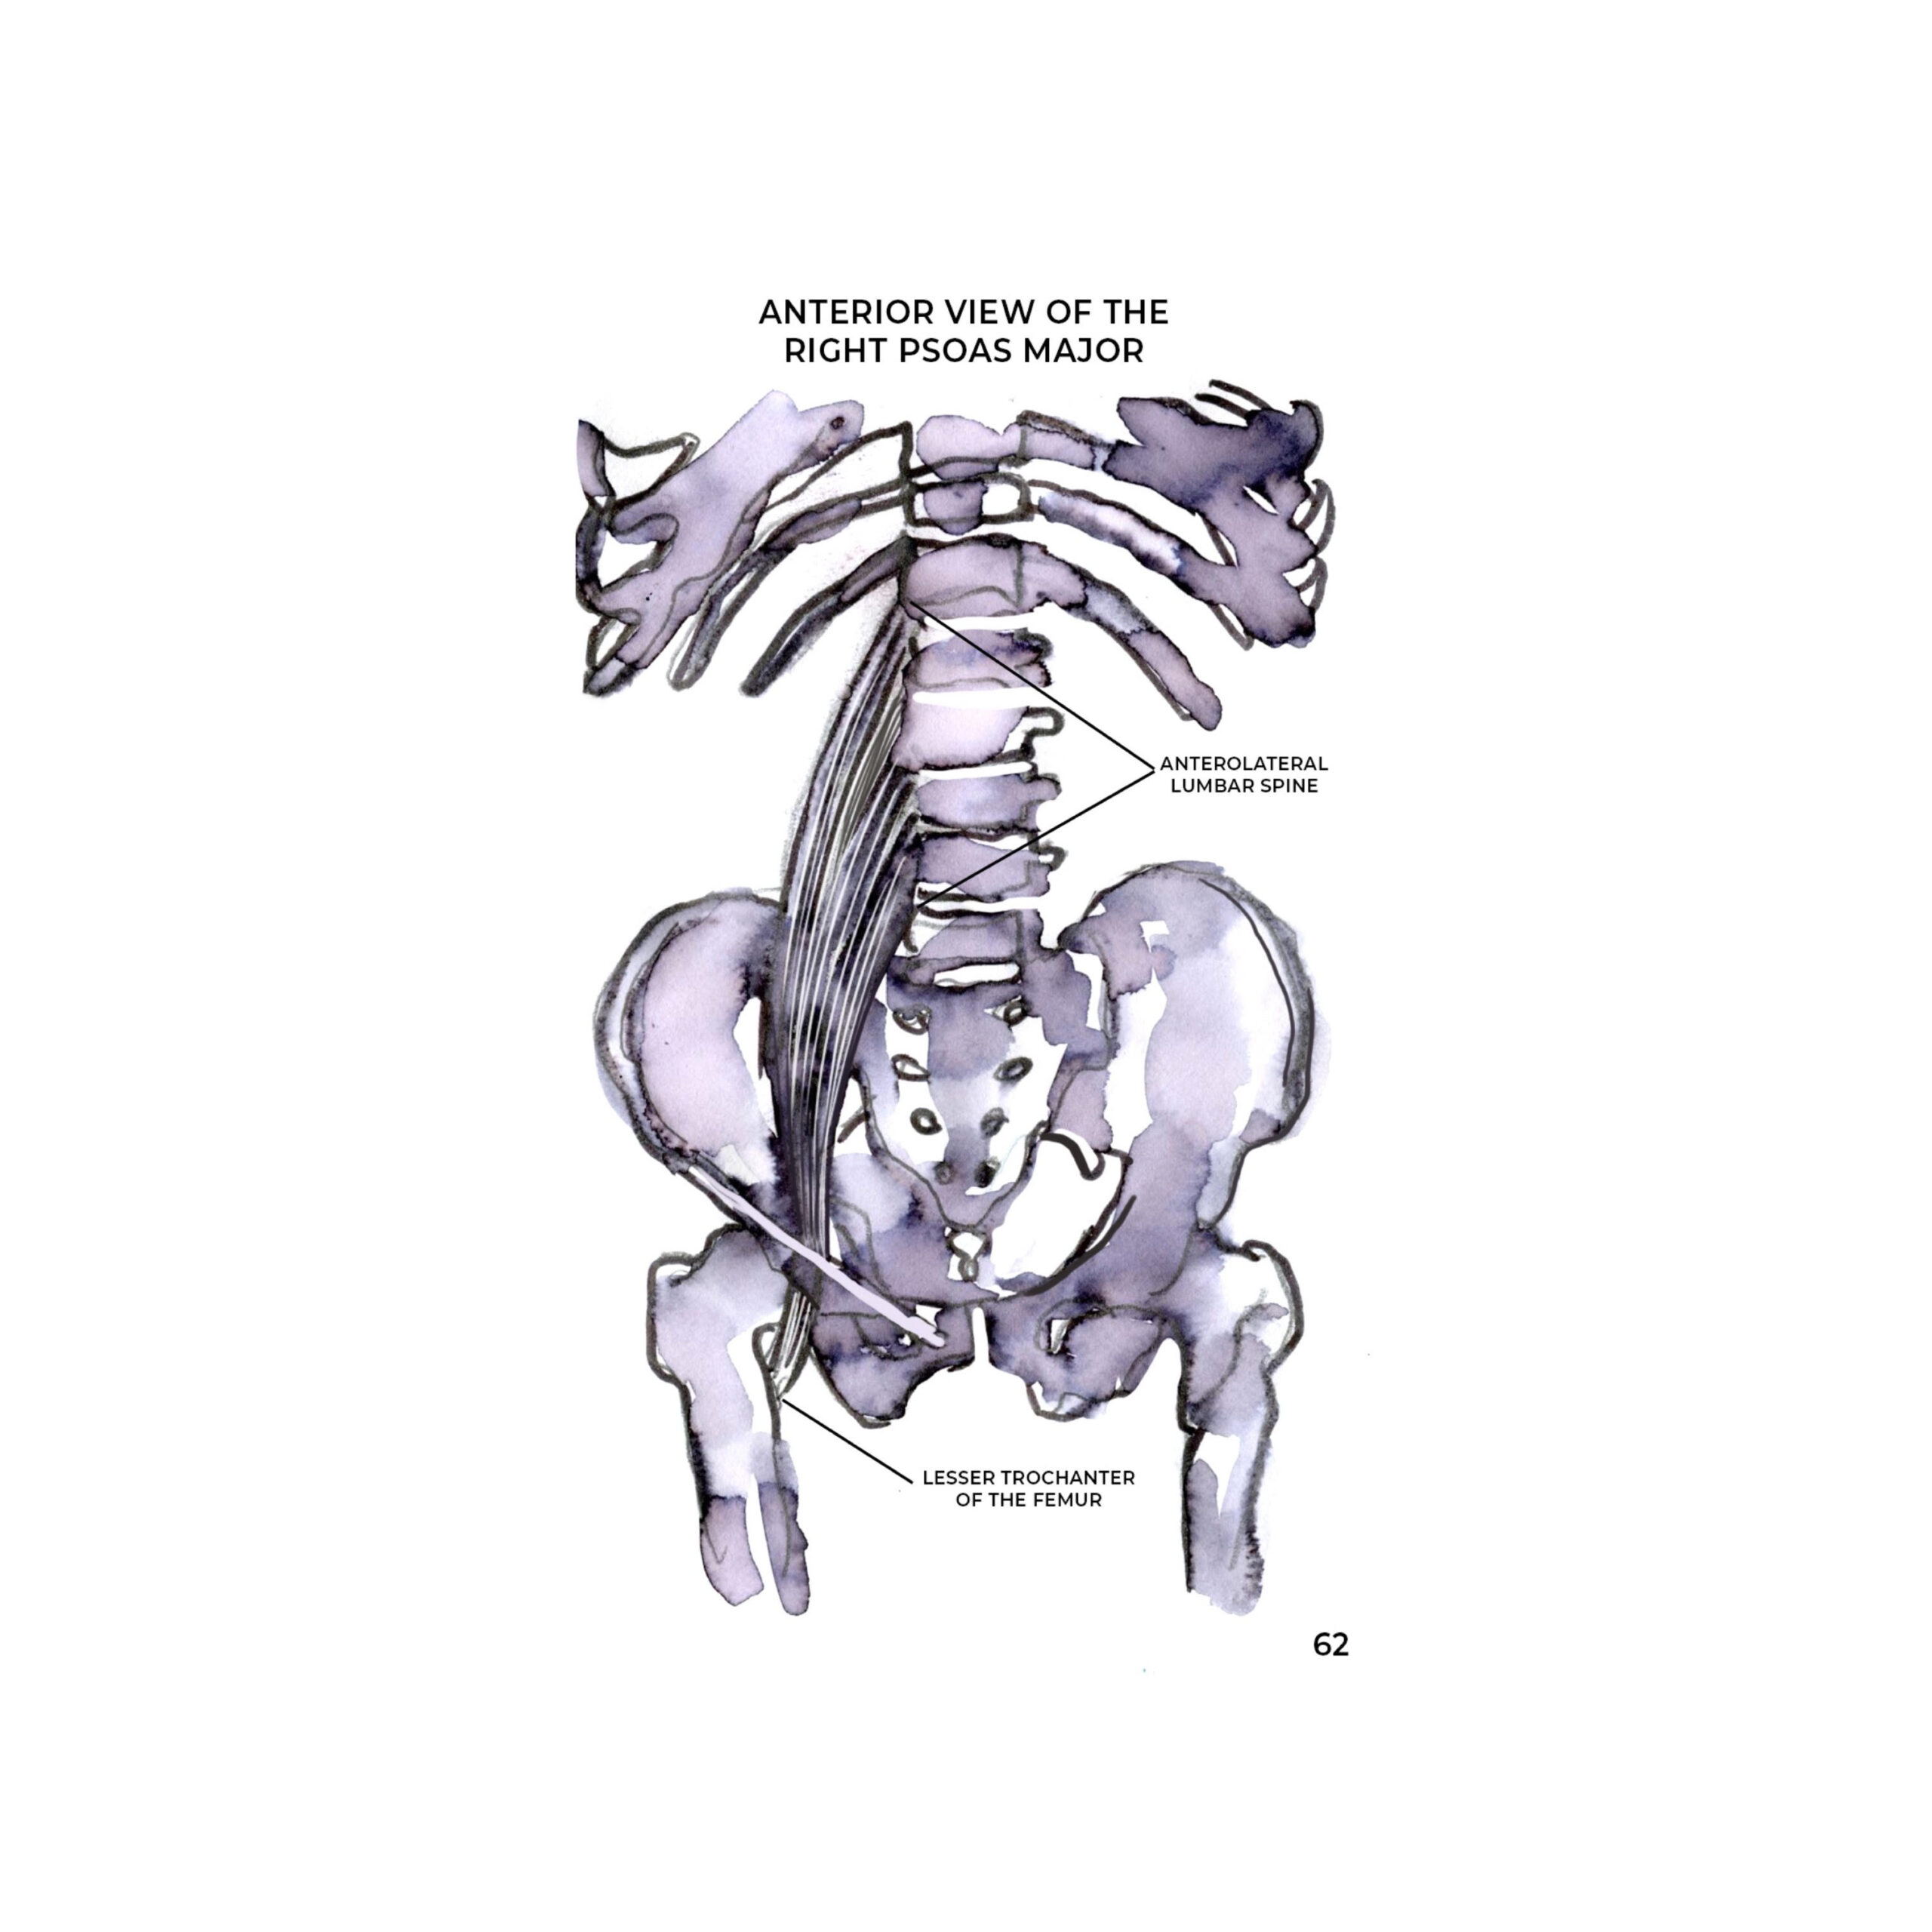
    The adductor muscle complex includes three adductor muscles: longus, magnus, and brevis. When the leg is off the ground, the adductors bring the leg towards midline. They also have secondary roles in flexion, extension, and rotation. When the foot is planted, the adductors help stabilize the pelvis and leg during the stance phase of gait. Three other muscles assist with adduction, including the gracilis, obturator externus, and pectineus.


    Most adductor tendon strains occur while the muscle is being forcibly stretched while trying to contract and shorten. This is called eccentric tension. The greatest eccentric tension is placed on the groin when the leg is externally rotated and abducted, as when an athlete pushes off in the opposite direction. The adductor longus is the most commonly injured of the adductor muscles, as it adducts and internally rotates the leg. It accounts for 62-90% of all groin strain cases. The adductor longus also has a low tendon to muscle ratio at its origin on the pubic ramus, which increases the likelihood of injury. Most injuries occur at the musculotendinous junction, although strains can occur anywhere along the muscle. The adductor tendons have a small insertion zone with a poor blood, yet rich nerve supply, making the perceived pain greater with these injuries.


    Most people who sustain a groin injury will describe a sudden onset of pain as opposed to a more gradual one. The pain is often severe and in the groin or medial thigh. Activity increases the pain. There may be bruising or swelling in moderate to severe strains. Typically, there is localized tenderness and pain with resisted hip adduction or passive stretching. Strength may be decreased depending on the severity of the injury. Acute injuries can take days or weeks to recover, whereas chronic strains may take many months. Bailey had no bruising or swelling and felt fine the next day, indicating a very mild strain.


    As you would expect, there is an increased risk of groin strain if a person has injured the groin or the hip before. Other risk factors include age, weak adductors, muscle fatigue, and inadequate flexibility of the adductor muscles. Biomechanical issues such as increased pronation of the foot/ankle or issues at the pelvis can also contribute. We all know where to find the best prehab out there for the hip and pelvis…LYT Daily! 🙂 Maintaining proper mechanics, strength, and flexibility are key components to avoiding injury. In fact, click the link below for Lara’s class called “The Groin Dilemma”, where she helps you strengthen and mobilize this area to keep it more supple!


    https://lytyoga.uscreen.io/programs/the-groin-dilemma


    Until then, I’ll see you on the mat!


    Xoxo,

    Kristin

  • Five Exercises for Hip Flexor Strain/Tendinopathy

    Five Exercises for Hip Flexor Strain/Tendinopathy

    Hip flexor strains are common injuries in fitness and athletics. Often caused by overuse, they can quickly sideline you and be quite painful if left untreated! In the early stages of the injury, we don’t want to aggravate the issue. With both a strain and a tendinopathy, there is a tearing of either the muscle or the tendon and that tear needs to heal. Unfortunately, after we sustain a tear, the new fibers want to lie back down in a disorganized pattern as opposed to the nice, parallel orientation of normal tissue. So the goal in the early phase of healing is to lengthen the soft tissues without irritating them, so when the new healthy tissue is created, it’s longer and stronger. In this subacute phase, we aren’t ready to start jumping, running, or kicking, but we’re no longer in severe pain.


    We can use something called reciprocal inhibition to rehabilitate these tissues without irritating them. With reciprocal inhibition, we will fire the antagonist gluteus maximus muscle to relax and lengthen the hip flexor muscle and tendon. The hip flexors will have to work eccentrically to control the movement. With the following exercises, you do not want to push into pain! So listen to your body and go from there. Begin with the first exercise and work your way down as you’re able:


    1. Kneeling Hip Flexor “Stretch” – Kneel on a yoga block with the knee of the affected side and step the foot of the unaffected side forward, coming into a 90/90 Lunge. Contract the gluteus maximus and slightly posteriorly tilt the pelvis, drawing the tailbone down. Contract and relax to lengthen out the hip flexor. Repeat 15-20x.
    2. Kneeling Hip Extension “Stretch” – In the same position as above, begin to shift forward a bit with the contraction of the glute, allowing the hip to extend. Do not push into a painful range. Contract, shift forward, relax and return. Repeat 15-20x.
    3. Bridge – Lie supine with the knees bent and feet flat on the floor. Lift the hips, allowing the hips to come into a fuller range of motion. Do not push into any pain. Repeat 3×10. Option to use a block between the thighs or knees.
    4. Forearm Quadruped Donkey Kick – Come onto hands and knees and then lower to the forearms. Bring the knee into the chest and then press the foot back, extending the hip. Make sure you don’t dump into the lower back. Repeat 3×10.
    5. Supported Bridge Marching – Place a block under the sacrum in a supported bridge. Begin to march one leg and then the other, beginning to do some concentric hip flexion against gravity. Control the movement in both directions. If you have pain, you aren’t ready for this one! If it feels too easy, try it without the block. Repeat 3×10. 


    Click on the link to our YouTube channel below, where you can see me perform these exercises! From there, you can link to my class on LYT Daily, specifically designed for people recovering from a hip flexor strain. Let’s get that hip back in shape and get you back on the mat!


    Xoxo,

    Kristin

  • Pre-Yoga Wrist Warm Up

    Pre-Yoga Wrist Warm Up

    It’s not uncommon for some people who practice yoga regularly to develop wrist pain, especially if they have spent the majority of their life working at a desk. Decreased range of motion, strength, and flexibility of the wrists combined with an increase in the demand placed upon these delicate joints through regular weight bearing in a yoga class can be the perfect recipe for injury. LYT yoga is the only method offering wrist stretches at the beginning of every class, but even in some cases, that’s not enough. If you’re having trouble with your wrists, a little extra warm-up before class could be just the thing you need. Try this out about 5 minutes before class starts and see if, over time, it helps!


    1. Make fists and roll the wrists clockwise and counterclockwise for 15-20 seconds in each direction. Do this once with the thumbs outside the fists and once with them inside.
    2. Open and close the hands quickly for 20-30 seconds, warming up the hand and forearm musculature.
    3. In Quadruped (all fours):
      •   Rock forward/back 5x and then side-to-side 5x. This range of motion should be pain-free, so you may not get the shoulders fully over the wrists to start. 
      •   Circle the shoulders around the wrists, 5x in each direction. Again, you might not be able to get the shoulders fully over the wrists to start.
      •   Repeat steps a & b with the fingers pointing out to the sides of your mat.  
      •   Flip the palms to face up, fingers pointing towards each other, and rock from side-to-side 5x, stretching the wrists into flexion. You will most likely have the majority of your weight in the hips and not over the wrists.


    Click on the link to our YouTube channel below, where you can see me perform a simple wrist warm-up. You can also find out how to modify your yoga practice if you’re suffering from acute wrist pain. From there, you can link my series on LYT Daily, “Weightless in the Wrists,” which includes six traditional LYT classes with little to no weight-bearing through the upper extremities, specifically for people with current pain and/or wrist dysfunction. Take care of your wrists so you can stay on your mat all year long!


  • Pre-Labor Preparation

    Pre-Labor Preparation

    Kristin-Williams-pregnant

    We happen to be in the midst of covering Pre- and Postnatal populations in our LYT Yoga Level 2 teacher training, which has me thinking of a whole other form of labor itself…the labor and delivery of babies! Having had three children of my own, I’ve been lucky enough to experience relatively uneventful labors. And while labor itself may not be the most fun, the end result is priceless. Looking back, I realize that I probably ignored what was right for my body both before and after delivery, in the pursuit of trying to feel “normal” and function like I always had. After listening to lectures given by our friend and fellow LYT instructor, Kristen Boccumini, I wish I’d been privy to her information while I was pregnant with my first 20 years ago today!

    Kristin-Williams-baby

    So much is happening during the nine to 10 months of pregnancy, particularly in the second and third trimesters. The abdominals get stretched, the rib cage flares, and the diaphragm changes shape to accommodate the growing uterus and baby within. The ligaments all over the body get lax to prepare the body for this expansion and future delivery of the baby. Finally, our posture changes dramatically to support the weight of the belly. And yet, if you were me, you tried to keep running well into your second trimester (or longer), paying no heed to the effect this might have later on. Is there something we can be doing to prepare the body for Labor Day? Yes, there is.


    According to Kristen, the first place to begin is with the breath and the posture. Both key components of LYT Yoga®, performing 360-degree breathwork and maintaining a neutral pelvis are integral to maintaining our connection to core, providing room for a growing baby, comfort in a growing body, and minimizing the risk of injury both pre- and post-delivery. Oftentimes, pregnant women will breathe only into the upper ribs, so the core musculature becomes dysfunctional and weak. The 360-degree breath, which includes breathing down into the lower lobes of the lungs and back body, helps to work the diaphragm down. This then helps fire the deep intrinsic core muscles clear down to the pelvic floor, getting it all to work in tandem and helping to prevent certain areas of the back from over-clenching. Maintaining good posture creates a balance and symmetry of the pelvis, which will, in turn, provide comfort for the pregnant mother, create space for the growing baby, and may increase the chances for better labor outcomes.


    So what are a couple of things to look for as your pregnancy progresses through each trimester and what can you avoid? During the first trimester, a lot is left up to the comfort of the mother. While there is no evidence that exercise of any type predisposes a person to a miscarriage, the first trimester is when the risk is highest so it is up to the discretion of the mother as to what feels right. Towards the end, lying on the belly may no longer be comfortable and should therefore be avoided. 


    During the second trimester, quadruped is the better option as opposed to anything on the belly, like cobra or locust. You should watch for doming of the abdomen during any type of lumbar flexion, whether it be ab curls or getting up from lying down. Doming of the abdomen is a sign of too much pressure across the linea alba, which is the long line of connective tissue between the abdominals. So if this occurs, back off the abdominal work and begin rolling to your side to come up from a lying position. A wider stance in forward folds may be more comfortable to accommodate for the belly. Avoid deep backbends, which we don’t promote in LYT Yoga® anyway, as the abdominals are already stretched and don’t need any help in this area! Twists may also become difficult due to the belly and may place undue stress on the abdominals as well, so keeping rotation to the upper thoracic spine is key.


    For the third trimester, continue the recommendations from the first and the second, but now we have to allow for the weight of the growing baby. So be careful with asymmetrical poses, which can put undue strain on the lower body ligaments. You’ll want to substitute with double leg postures and shorten the stance in order to keep the strain across the pelvis minimal and equal. During twists, a hand placed on the belly to keep it centered and encourage the twist from above is an option as well. Props such as the wall, blocks, bolsters, chairs, and blankets can be excellent ways to help modify your practice and keep you on your mat longer. 


    Finally, just remember mamas, LABOR IS UNPREDICTABLE. However, your baby arrives on your Labor Day, accept it with love. There should be no expectations with regards to labor, as a baby may have its own plans! So on this upcoming Labor Day holiday, celebrate our working classes and mamas alike. Feel free to check out either our Pre- or Post-Natal Series on LYT Daily for classes to help you through and past your own labor and delivery. Your body and your baby will thank you! Until then, I’ll see you on the mat!


    Xoxo,

    Kristin

  • Practicing During Your Period

    Practicing During Your Period

    A question that comes up a lot both on the Redefining Yoga Q & A Podcast and in our LYT Yoga Teacher Training is should a person practice yoga during their period? There are those who would say a woman should never practice during menstruation. Eye roll. Then there are those who say you shouldn’t do inversions during menstruation. They claim that inverted poses (such as handstand or forearm balance) reverse the prana, or energy flow, which is normally from the naval down to the pelvic floor. They claim this reversal of energy flow can disturb the menstrual process and lead to reproductive issues later on. This is simply not true. Neither the position of the body nor the gravitational pull of the earth has any effect on menstrual flow. Female astronauts spending months in space report having completely normal menses despite being in zero gravity the entire time. People may also claim that inversions place undue strain on the broad ligaments of the uterus and cause a partial collapse of the veins, allowing the arteries to pump blood into the abdomen. These claims have been also shown to be baseless, with no scientific proof behind them. 


    What the science has shown is that exercise is an optimal treatment method for pain during your period. More than 50% of women have painful periods and 10% of them are so severe that they disrupt 1-3 days of their lives each month. Cramps, medically known as primary dysmenorrhea, occur when the uterus contracts due to reduced blood supply. It’s believed to be caused by the release of prostaglandins and other inflammatory proteins in the uterus, which is mediated by the sympathetic nervous system. Exercise has been shown to decrease stress, which decreases the activity of the sympathetic nervous system, thereby decreasing menstrual pain. Physical activity also decreases vasoconstriction and increases estrogen and progesterone, which can decrease symptoms. Exercise during menstrual pain can also lead to faster transfer of wastes and prostaglandins from the uterus. 


    The research is unclear regarding what type of exercise is best for managing menstrual symptoms. Most studies agree that the type of exercise should be of moderate intensity and aerobic, to encourage the release of endorphins for pain and stress relief. Studies have also shown a greater decrease in pain from longer periods of exercise (8-weeks as compared to 4-weeks). From a personal perspective, I know that during the first two days of my period, my pelvic joints are a little less stable and are more prone to pain with prolonged standing or high impact activities. So I modify my LYT Yoga® practice accordingly. I may choose to do an intermediate level class with less plyometrics or modify a higher level class to minimize pressure through the joints. I may opt for a run-walk as opposed to a run, or in some cases, I’ll choose yoga over running on those days. It’s important to listen to your body. But know with confidence that science has shown exercise to be beneficial in treating menstrual symptoms. There is no evidence behind inversions affecting menstrual flow or reproduction. We have heard countless stories from LYT Yoga® practitioners that connecting to the core with this method of yoga has vastly improved their menstrual pain. How great is that?! On that note, you know where you can always find me, any time of the month…on the mat!


    Xoxo,

    Kristin  

  • The Triple S

    The Triple S

    You’ve heard us say it– and you may have even purchased our shirts in the LYT store. Posture F*cking Matters.  Now I’m not sure how you could be a LYT lover and not have heard of the Triple S, but just in case, I’m going to break it down for you. 🙂


    Triple S is a termed Lara coined a few years ago as a simple way to remember how to achieve the optimal posture. There are three bony landmarks to remember:


    1. SKULL – more specifically, the back of the head
    2. SCAPULA – also known as the shoulder blade, a flat triangular bone that lies upon the rib cage and is part of the shoulder girdle
    3. SACRUM – the fused bottom portion of the spine, which is sandwiched between the ilia of the pelvis.


    In order to obtain an optimal postural alignment, the skull, scapula, and sacrum should be in line with one another. For example, if you were to stand up against the wall, the back of the skull, scapula and sacrum should all come in contact with the wall. The Triple S recreates the natural curves of the spine and stacks the head atop the vertebral column. So why is this important?

    Lara-Triple-S

    As Lara likes to say, the forward head and rounded shoulders posture is a pandemic of its own. Just to give you an idea how much the slightest shift forward of the head impacts the neck, consider this: A normal human head weighs roughly 10-12 lbs. If we were to shift the head forward 15 degrees at a time, the weight through the cervical spine increases as follows:


    • 0 degrees = 10-12 lbs
    • 15 degrees = 27 lbs 
    • 30 degrees = 40 lbs
    • 45 degrees = 49 lbs
    • 60 degrees = 60 lbs


    That’s pretty staggering when we consider that most people probably hold their head in 45 degrees of cervical flexion while texting or playing on their phones…roughly five times the amount of strain through the cervical spine. But that’s not the only issue at hand. Coupling the forward head with the rounded shoulders and upper back results in something we call “Upper Crossed Syndrome”.


    In Upper Crossed Syndrome, we develop tight muscles in the posterior neck and shoulders and anterior chest and weak/inhibited muscles in the anterior neck and posterior shoulders. If we visual this as a large X drawn on a body facing left, with the center running right through the base of the neck, it would look like this:

    Upper-Crossed-Syndrome

    Hence the name, Upper Crossed Syndrome. This imbalance is due to losing your Triple S both in standing and sitting. The number of secondary issues that arise from the aforementioned imbalance in the body is all but endless. It includes (but far from limited to): tension headaches, jaw pain, neck pain, shoulder pain and dysfunction, low back pain, rib pain and dysfunction, thoracic outlet syndrome, carpal tunnel, etc etc.


    So take a moment and find your Triple S. You can start on the floor, where gravity can assist. Progress to the wall and then to sit and stand independently. Your future self will thank you! 


    Xoxo,

    Kristin

  • The Science of Sweat

    The Science of Sweat

    Today we’re going to talk about SWEAT. Ewww, gross, right? NO! We love to sweat in LYT! Have you ever wondered why we sweat? What is the science behind perspiration? To put it simply, sweating is our body’s natural air conditioning unit. When our body temperature rises from exercise, heat, stress, or even hormone changes, we sweat to keep our body temperature at a comfortable 98.6 degrees F.


    Most know that sweat glands are located within the skin. However, you may not know that we have three types of sweat glands, which differ in size, location, and function:

    1. Eccrine Sweat Glands – smaller in size, these are found all over the body and are responsible for the highest volume of sweat excretion. Humans have ~2-4 million eccrine sweat glands in total, with the highest density on the palms of the hands and soles of the feet. They open directly onto the surface of the skin and respond to both thermal and emotional stimuli.
    2. Apocrine Sweat Glands – also known as odoriferous (smelly) sweat glands, these are large in size, but are confined to the axillary (armpit) and genital regions. They open directly into hair follicles as opposed to the surface of the skin. Because they are limited to specific areas of the body, they play a smaller role in overall sweat production.
    3. Apoeccrine Sweat Glands – only recently described in the literature, these glands are intermediate in size and share properties with both apocrine and eccrine glands. They are limited to the axillary region and empty directly onto the surface of the skin.

    Sweat Pore

    So why do we sweat? In a word: thermoregulation. The mechanical efficiency of humans is not great, so we need a mechanism to rid the body of any excess heat build-up. The primary means by which the body heats up is externally from the environment and internally by our metabolism, which is the process of converting food to energy and the elimination of waste. The amount we sweat is primarily determined by these two factors. During exercise, a large amount of heat is produced by the muscles as a byproduct of metabolism, which is directly proportional to exercise intensity. In addition, heat from the air is transferred to the body when it’s hotter than the temperature of the skin, increasing the body temperature externally. When either or both of these factors cause the internal temperature of the body to rise, our sweat glands release water to the skin surface, transferring heat from the body to it. There it quickly evaporates, cooling the skin and the blood beneath. This is known as evaporative heat loss and is the most effective means of thermoregulation in humans.  


    There is a common perception that sweating has a variety of other critical functions for maintaining homeostasis in the body unrelated to thermoregulation. Eccrine sweat is thought to play a role as a natural barrier to skin through its delivery of water, moisturizing factors, and antimicrobial peptides, pointing to a potential role in defense against skin infection. The notion that sweating accelerates the breakdown and elimination of toxins from the body has been around for years as well. As attractive as this idea sounds, there is little to any solid evidence to date that supports this. Although they do participate in this function, the role of sweat glands is minor as compared to the liver (breakdown) and kidneys and GI tract (excretion). 


    Finally, sweat is not just water. It also contains sodium (Na), chloride (Cl), potassium (K), calcium (Ca), and magnesium (Mg). This is important because something that has been found in the literature is enhanced sweating with better heat acclimation and aerobic training. Heat adaptation leads to improved salt (NaCl) conservation through a decrease in sweat, minimizing disruptions to the whole-body electrolyte balance. While the degree of conservation varies in the literature, the reported decrease in salt loss after 10 days of heat acclimation ranges from ~30-60%. Aerobic training has been associated with an earlier onset and greater responsiveness of sweating in relation to body core temperature.  


    So get on your mat today and SWEAT! Your body will thank you! 


    Xoxo,

    Kristin

  • Hip Labral Tears

    Hip Labral Tears

    Many of our LYT Prime regulars and certified LYT Yoga Teachers who’ve taken my Sequencing Lab Modules are well acquainted with my husband, Tim. He’s the 6’2” 210 lb super yogi who could always be found sweating his butt off next to me in Lara’s classes, heard grunting and panting off camera while I taught my 6:00 am T/Th class virtually, or seen practicing as my student in the Labs! Ever since I started teaching (and made him come with me to my first class so at least ONE person showed up), he fell head over heels in love with LYT Yoga and rarely missed class. Then roughly three years ago, we went to another studio while on vacation and the teacher took us into Lizard lunge in the first 10 minutes of class. I remember at the time thinking yikes, this is really early to be going into such a relatively deep pose. Tim felt and heard a pop in his right hip. Over the years, the pain has come and gone, and progressively gotten worse. He hasn’t been able to tolerate a class since February 2021 and a recent MRI revealed a tear of the anterior labrum and advanced arthritis.


    Although previously thought to be a relatively uncommon injury, acetabular labral tears are being diagnosed with increased frequency due to improvements in diagnostic imaging. The prevalence of labral tears in people with anterior hip or groin pain is thought to be between 22-55%. The labrum is a rim of cartilage that outlines the socket of the hip joint, called the acetabulum. The thickness of the labrum varies between 2-3 mm thick. It is wider and thinner in the anterior portion and thicker posteriorly. It functions as a shock absorber, joint lubricator, and pressure distributor in the hip joint. It also provides stability to the hip by deepening the acetabulum by 21% and increasing the surface area of the acetabulum by 28%. This helps to distribute the load across the joint surfaces. Creating a seal for the joint, it helps keep the head of the femur (the ball of the joint) away from the acetabulum by maintaining the synovial joint fluid pressure within the joint. Not surprisingly, a compromise of the labrum has been associated with early joint degeneration. A study by McCarthy et al. found that 73% of patients with fraying or tearing of the acetabulum had damage to the joint cartilage and it was greater in those with the tears. They also found that in 94% of these patients, the joint damage was in the same area as the labral tear. They suggested that the risk of joint damage roughly doubles in the presence of a labral lesion. 


    More than 90% of people diagnosed with a hip labral tear complain of anterior hip or groin pain. Pain is also reported in the lateral region or deep in the posterior buttocks, albeit less often. People often describe a constant dull pain with intermittent episodes of sharp pain that worsens with activity. Walking, pivoting, bending over, prolonged sitting, and impact activities like running can aggravate symptoms. People often present with a limp, need a banister to climb stairs, and cannot walk long distances due to pain and weakness. Finally, the presence of clicking, locking, catching, or giving way is common as well.


    The most consistently positive finding in people with a labral tear is a positive Anterior Hip-Impingement Test. This test is performed with the person on their back and the hip and knee flexed to 90 degrees. The hip is internally rotated and adducted. The test is considered positive if the pain is reproduced in the anterolateral hip or groin.


    Although tears have been reported in all regions of the labrum, most tears found in the United States occurred in the anterior portion. Mintz et al. found 94% of the labral tears in their study were anterior. McCarthy et al. found 86% were anterior in theirs. Different reasons for the high prevalence of anterior tears have been suggested, including a relatively poor blood supply anteriorly as compared to the other regions and the fact that it’s thinner and therefore weaker. More than likely it’s also due to the fact that in Western civilization, this area is subjected to higher forces and greater stress during regular daily activities. Interestingly, in Japan the majority of tears occur in the posterior labrum, likely due to the frequent practice of squatting and sitting on the floor, which places more strain across the posterior region.


    Whether labral tears have the potential for healing is controversial. Some articles report no potential and others report some potential for healing. In my clinical experience, improving joint capsular range of motion with manual therapy and limiting painful movement patterns that increase forces across the labrum, particularly the anterior labrum, have been beneficial. I’ve created a 4 video LYT Yoga Hip Pathology Series for LYT Daily which modifies our traditional practice to accommodate just this. I have been interviewing my husband and former patients and friends who’ve had hip joint issues including labral tears to determine just what bothers them and what seems to help. So if you suffer from hip joint pain/pathologies or know someone who does, go give it a try! Until then, I’ll see you on the mat!


    Xoxo,

    Kristin