Category: Blog Posts

  • Vegan Apple Spice Cake

    Vegan Apple Spice Cake

    It’s fall, y’all and there is nothing better than filling your home with the warm delicious smell of apple and spice! Today, let’s take those apples you just picked from your weekend at the local orchard and make a healthy(ish) treat that is moist, delicious AND easy to make! It is vegan, dairy-free, egg-free and high in fiber and might just be your go-to cake to bring to your next fall family gathering!

    Vegan Apple Spice Cake

    Recipe Notes
    Be sure to grease your bundt pan very well – this will ensure your cake comes out in one piece.  If you prefer, you can make this cake in a large loaf pan, however, you may need to increase the baking time slightly.

    This recipe has been adapted from The Simple Green Blog.


  • Shoulder Labral Tear

    Shoulder Labral Tear

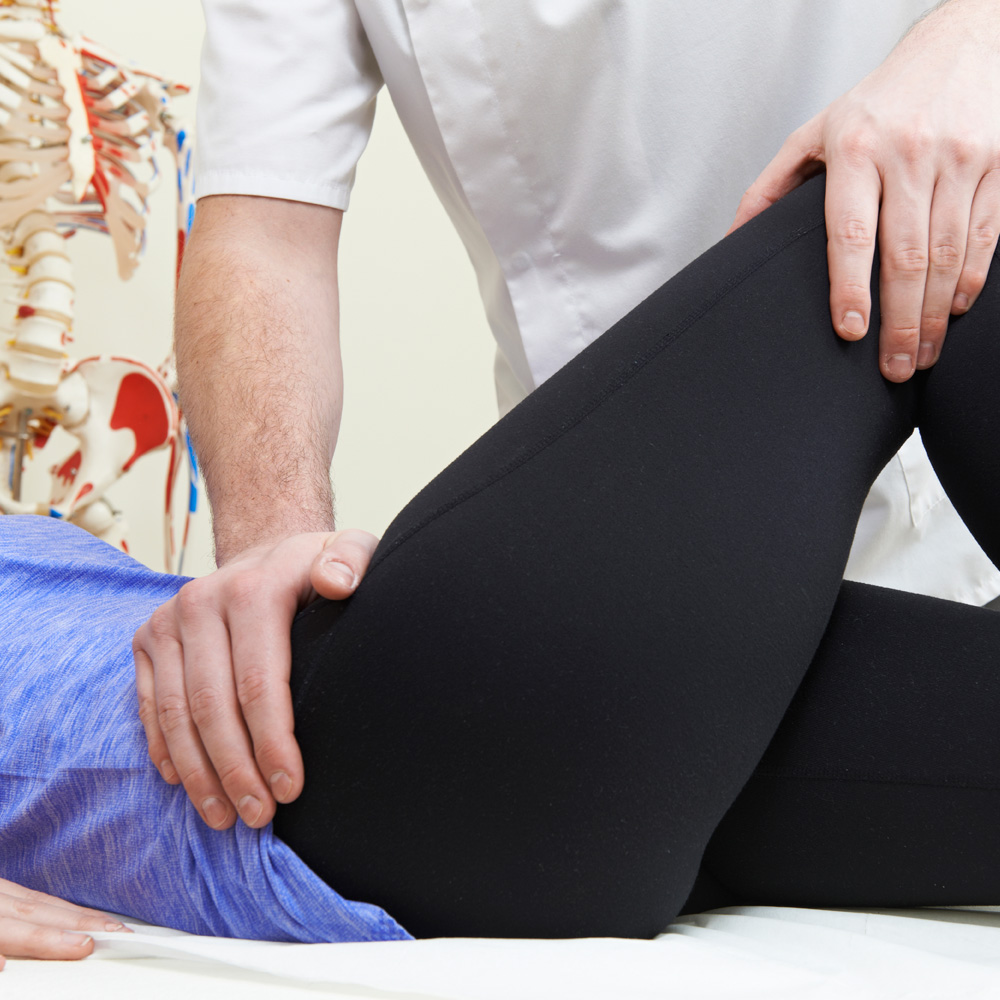
    Many of you who practice with me regularly know that I have a cranky right shoulder. Several years ago, I was working on a fellow physical therapist who is around 6’2” and roughly 250 lbs. His back was bothering him so I wanted to help him out. It had been a long morning of treating patients. I began to manipulate his sacroiliac joint, a maneuver that requires me to thread my arm through his. In this maneuver, my right shoulder was flexed and internally rotated.


    I’ve done this technique thousands of times without any issue, but this time when I leaned away and used my body weight to roll him, I felt and heard a tearing in my shoulder. He heard it too.  He looked at me, I looked at him, and we simultaneously muttered, “Uh-oh.” I never had any diagnostic tests done and rehabbed it myself, but I suspect I tore my labrum.


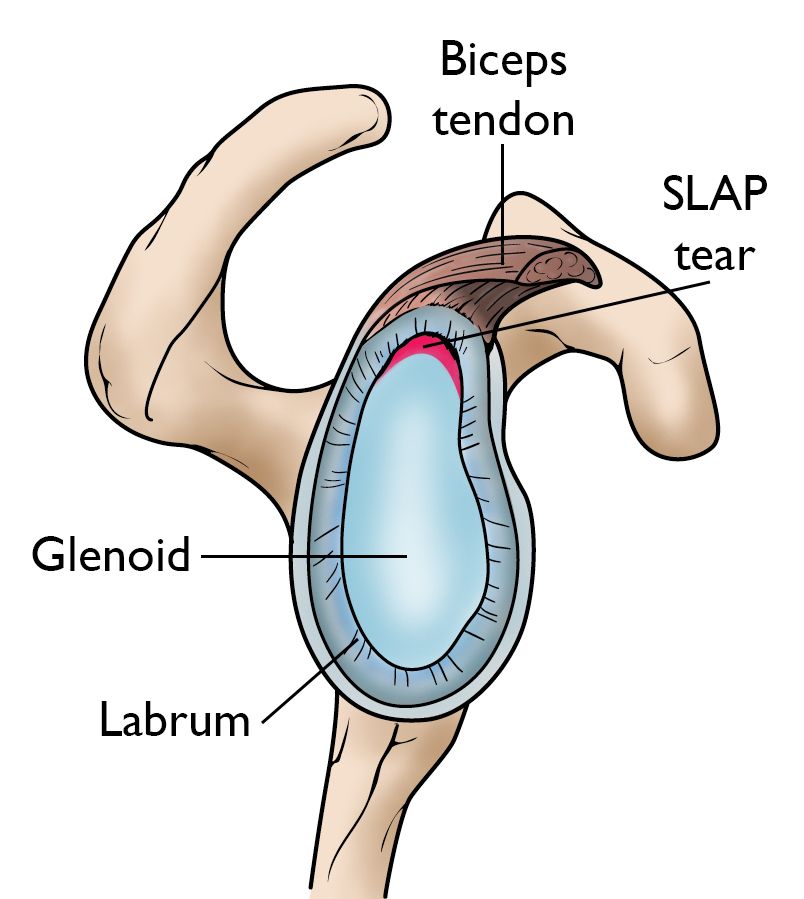
    The labrum of the shoulder is a fibrocartilaginous rubbery rim attached around the margin of the socket. It cushions the joint called the glenoid fossa, which is part of the scapula (shoulder blade). The socket is quite shallow and small, covering at most only a third of the ball (the head of the humerus). 


    One function of the labrum is to deepen the socket. It increases the contact area between the ball and socket by 2 mm at the front and back and 4.5 mm at the top and bottom. If you took a cross-section of the labrum, it would look like a triangle, where the wide base attaches to the edge of the socket, leaving the edge of the labrum thin and sharp at the point. This shape allows it to almost act like a washer, sealing the ball and socket together. 


    This is called a “viscoelastic piston effect” and maintains a negative pressure within the joint. It’s especially effective against traction or pulling stresses and, to a lesser extent, against shearing stresses. Finally, the labrum provides an insertion point for stabilizing structures, including the joint capsule ligaments and the tendon of the long head of the bicep muscle.


    The labrum is often compared to the face of a clock, with 12 o’clock being at the top (superior), 3 o’clock at the front (anterior), 6 o’clock at the bottom (inferior), and 9 o’clock at the back (posterior). Most instabilities in the shoulder are associated with injuries to or changes within the glenoid labrum, particularly where the long head of the biceps tendon inserts at the superior (12 o’clock) portion. They are commonly called SLAP tears, as they involve a Superior Lesion from Anterior to Posterior, usually between 10 and 2 o’clock.


    Different types of SLAP tears typically involve different mechanisms of injury.  A common mechanism is falling on an outstretched arm or pulling suddenly when lifting a heavy object, as I did with my fellow PT. Other mechanisms include repetitive shoulder abduction and external rotation, like the movements that many throwers, overhead athletes, or manual laborers perform over and over.  A direct blow to the shoulder, as with tackling in football can also be a cause. SLAP tears can occur in a degenerative manner for the aging population as well.


    Treatment for SLAP tears includes both nonoperative and operative measures. Both have proven successful among certain populations. Previous studies indicate that nonoperative management is successful for anywhere from 22 to 85% of patients. Operative repair in adults is reported to be successful for between 80 and 97% of patients. It often helps alleviate the pain and return of range of motion.  


    Among overhead athletes, many patients are unable to return to their prior level of performance.  Results vary widely in this population, with between 7 and 84% demonstrating a return to their prior level of performance. As patients age beyond 40 years old, surgeons typically opt to perform a biceps tenodesis. In this surgical procedure, the tendon of the long head of the bicep is detached from the labrum and anchored to the proximal humerus. Repair success rates are lower among older populations, so this is the most effective treatment of choice.


    I continue to address my shoulder issue with home exercises and activity modifications and so far, so good! As I say all the time in Stretch class, the shoulder joint is our most mobile, but also our most unstable. For all the parts to work in harmony, it requires a high quality of movement.  Paying attention to how we move on our mats and keeping the ball centered in the socket is important for many reasons, but especially to avoid placing repetitive undue strain on the labrum.


    Continue using your LYT Yoga® practice to build strength and good brain mapping in the shoulder joint complex. Until then, I’ll see you on the mat!


    Xoxo,


    Kristin

  • Vestibular System

    Vestibular System

    Proust quote

    ~ Marcel Proust


    Lara’s quote this week references looking at the world through new eyes and it made me think of how disorienting the world is if something messes with our vision! For example…vertigo. If you’ve never had it, lucky you! If you have, you are fully aware how your vision can be affected by it.


    Vertigo is caused by a disruption to the vestibular system, which is a complex set of structures and neural pathways that helps us maintain balance and spatial orientation. It does so by detecting the position and movement of our head in space. There is a vestibular apparatus in the inner ear where this whole process begins. It sends signals to multiple places in the body, including the eyes and central nervous system. This is all reflexive, or unconscious. The activity between the vestibular system and the eyes is called the vestibulo-ocular reflex (VOR), which allows the eyes to remain fixed on an object while the head is moving. The activity between the vestibular system and the spine is called the vestibulospinal reflex (VOS), which coordinates the muscles of the spine with head movement to maintain balance and posture.


    Any disruption along the pathway can lead to various symptoms including vertigo, imbalance, nausea, vomiting, visual disturbances, hearing changes, and uncoordinated eye movements. When you have vertigo, it can feel like the world is spinning despite the fact that you’re lying completely still. As a result of this vestibular disruption, dizziness, nausea, and vomiting can occur. The most common type of vertigo is benign paroxysmal positional vertigo (BPPV), which usually only lasts for seconds to minutes. It is believed to be due to the displacement of tiny crystals in the ear canals called otoconia which causes an inappropriate sensation of movement. I suffer from occasional bouts of BPPV, which luckily only last a couple of seconds, but can be very disorienting. In my case, when I turn my head, my vision stutters hard back and forth for a second or two and I feel a sudden onset of dizziness. It goes away as quickly as it comes on, but can leave me feeling a little nauseated. Most people report having a spinning of their visual field, which often causes a loss of balance coupled with nausea and/or vomiting. A hallmark of BPPV is nystagmus, which is uncoordinated eye movement in response to moving the head. So when a person’s head is turned in one direction, the eyes will beat quickly back and forth, indicating a failure of the VOR to work.


    Meniere disease is another type of vertigo which can last for hours with the same symptoms as BPPV, but also includes hearing loss and tinnitus, or a ringing in the ears. With Meniere, there is an expansion of fluid in the ear, impacting the vestibular apparatus. My dad suffers from Meniere disease, so clearly vertigo runs in the family! In his case, he will typically have it right upon waking in the morning and he immediately feels nauseated. If he tries to get out of bed, he will have violent episodes of visual spinning and vomiting. It can last for the entire day. By the next day, although tired, he usually feels fine.


    Another type of vertigo is viral labyrinthitis, which is caused by inflammation of the vestibular nerve as a result of a viral infection. Symptoms can last from days to weeks and include hearing loss in the ear that is affected and a loss of balance. These three forms of vertigo are called peripheral because they include the inner ear as the main source of vestibular disruption. There are also forms of vertigo caused by central nervous system lesions in the brainstem, pons, or cerebellum, which are much more serious in nature. Central vertigo can be the result of a stroke, multiple sclerosis, toxicity due to medication, tumors, etc.


    It’s not until you lose your vision that you really appreciate its role not only in daily function but in balance and proprioception. In LYT Yoga, I like to create classes that challenge the brain and body by purposely affecting the vestibular system through movements of the head or closing the eyes. It not only heightens our appreciation of this intricate and vital ability, but helps to train each individual portion, making us stronger in the long run. Click the link below to check out my class “Toe The Line” and see how your vestibular system is working! Until then, I’ll see you on the mat!


    https://lytyoga.uscreen.io/programs/toe-the-linemp4-6cb992


    Xoxo,

    Kristin

  • Groin Strain

    Groin Strain

    I always feel a little sick to my stomach when one of my kids texts me from their various sporting activities and it says, “Mom, I hurt my (fill in the blank)”. In my profession, I have seen some crazy injuries over the years and unfortunately, I am a worry wart by nature. Bad combo! So earlier this week, I got a text from Bailey towards the end of the competitive cheer practice, “Mom, I hurt my leg” and, of course, my mind went to the worst case scenario like ACL tear or fracture. When I asked what happened she replied, “I don’t know. I was doing jumps and then I pulled something where my thigh meets my pubic bone.” Of course she didn’t say “pubic bone”, so after I laughed out loud, I sighed in relief that it sounded like a groin strain and nothing more. 


    Muscle strains are the number one injury in athletes, accounting for up to 31% of doctor visits. A groin strain, which is a strain to the adductor muscle group, is common, especially among soccer and hockey players. Other sports where we might see them include football, basketball, tennis, figure skating, baseball, horseback riding, karate, softball, and yes, cheerleading. Suddenly accelerating while sprinting is the most common cause of a groin strain, but sudden changes in direction while running also put exaggerated strain on the tendon. Finally, jumping and overstretching the adductor tendon is less common, but can occur as well, as was the case with Bailey.

    groin_strain_1


    The adductor muscle complex includes three adductor muscles: longus, magnus, and brevis. When the leg is off the ground, the adductors bring the leg towards midline. They also have secondary roles in flexion, extension, and rotation. When the foot is planted, the adductors help stabilize the pelvis and leg during the stance phase of gait. Three other muscles assist with adduction, including the gracilis, obturator externus, and pectineus.


    Most adductor tendon strains occur while the muscle is being forcibly stretched while trying to contract and shorten. This is called eccentric tension. The greatest eccentric tension is placed on the groin when the leg is externally rotated and abducted, as when an athlete pushes off in the opposite direction. The adductor longus is the most commonly injured of the adductor muscles, as it adducts and internally rotates the leg. It accounts for 62-90% of all groin strain cases. The adductor longus also has a low tendon to muscle ratio at its origin on the pubic ramus, which increases the likelihood of injury. Most injuries occur at the musculotendinous junction, although strains can occur anywhere along the muscle. The adductor tendons have a small insertion zone with a poor blood, yet rich nerve supply, making the perceived pain greater with these injuries.


    Most people who sustain a groin injury will describe a sudden onset of pain as opposed to a more gradual one. The pain is often severe and in the groin or medial thigh. Activity increases the pain. There may be bruising or swelling in moderate to severe strains. Typically, there is localized tenderness and pain with resisted hip adduction or passive stretching. Strength may be decreased depending on the severity of the injury. Acute injuries can take days or weeks to recover, whereas chronic strains may take many months. Bailey had no bruising or swelling and felt fine the next day, indicating a very mild strain.


    As you would expect, there is an increased risk of groin strain if a person has injured the groin or the hip before. Other risk factors include age, weak adductors, muscle fatigue, and inadequate flexibility of the adductor muscles. Biomechanical issues such as increased pronation of the foot/ankle or issues at the pelvis can also contribute. We all know where to find the best prehab out there for the hip and pelvis…LYT Daily! 🙂 Maintaining proper mechanics, strength, and flexibility are key components to avoiding injury. In fact, click the link below for Lara’s class called “The Groin Dilemma”, where she helps you strengthen and mobilize this area to keep it more supple!


    https://lytyoga.uscreen.io/programs/the-groin-dilemma


    Until then, I’ll see you on the mat!


    Xoxo,

    Kristin

  • Vegan Charcuterie Board

    Vegan Charcuterie Board

    This impressive Charcuterie Board is the essence of easy entertaining! Piled high with fresh and colorful vegetables, beans, nuts, vegan meat and more, your guests will be wowed by this gorgeous and delicious spread. This is one of my favorite appetizers for a party, and since today is World Vegetarian Day, let’s give the classic meat and cheese charcuterie board a healthier makeover!

    Vegan Charcuterie Board


  • Five Exercises for Hip Flexor Strain/Tendinopathy

    Five Exercises for Hip Flexor Strain/Tendinopathy

    Hip flexor strains are common injuries in fitness and athletics. Often caused by overuse, they can quickly sideline you and be quite painful if left untreated! In the early stages of the injury, we don’t want to aggravate the issue. With both a strain and a tendinopathy, there is a tearing of either the muscle or the tendon and that tear needs to heal. Unfortunately, after we sustain a tear, the new fibers want to lie back down in a disorganized pattern as opposed to the nice, parallel orientation of normal tissue. So the goal in the early phase of healing is to lengthen the soft tissues without irritating them, so when the new healthy tissue is created, it’s longer and stronger. In this subacute phase, we aren’t ready to start jumping, running, or kicking, but we’re no longer in severe pain.


    We can use something called reciprocal inhibition to rehabilitate these tissues without irritating them. With reciprocal inhibition, we will fire the antagonist gluteus maximus muscle to relax and lengthen the hip flexor muscle and tendon. The hip flexors will have to work eccentrically to control the movement. With the following exercises, you do not want to push into pain! So listen to your body and go from there. Begin with the first exercise and work your way down as you’re able:


    1. Kneeling Hip Flexor “Stretch” – Kneel on a yoga block with the knee of the affected side and step the foot of the unaffected side forward, coming into a 90/90 Lunge. Contract the gluteus maximus and slightly posteriorly tilt the pelvis, drawing the tailbone down. Contract and relax to lengthen out the hip flexor. Repeat 15-20x.
    2. Kneeling Hip Extension “Stretch” – In the same position as above, begin to shift forward a bit with the contraction of the glute, allowing the hip to extend. Do not push into a painful range. Contract, shift forward, relax and return. Repeat 15-20x.
    3. Bridge – Lie supine with the knees bent and feet flat on the floor. Lift the hips, allowing the hips to come into a fuller range of motion. Do not push into any pain. Repeat 3×10. Option to use a block between the thighs or knees.
    4. Forearm Quadruped Donkey Kick – Come onto hands and knees and then lower to the forearms. Bring the knee into the chest and then press the foot back, extending the hip. Make sure you don’t dump into the lower back. Repeat 3×10.
    5. Supported Bridge Marching – Place a block under the sacrum in a supported bridge. Begin to march one leg and then the other, beginning to do some concentric hip flexion against gravity. Control the movement in both directions. If you have pain, you aren’t ready for this one! If it feels too easy, try it without the block. Repeat 3×10. 


    Click on the link to our YouTube channel below, where you can see me perform these exercises! From there, you can link to my class on LYT Daily, specifically designed for people recovering from a hip flexor strain. Let’s get that hip back in shape and get you back on the mat!


    Xoxo,

    Kristin

  • Pre-Yoga Wrist Warm Up

    Pre-Yoga Wrist Warm Up

    It’s not uncommon for some people who practice yoga regularly to develop wrist pain, especially if they have spent the majority of their life working at a desk. Decreased range of motion, strength, and flexibility of the wrists combined with an increase in the demand placed upon these delicate joints through regular weight bearing in a yoga class can be the perfect recipe for injury. LYT yoga is the only method offering wrist stretches at the beginning of every class, but even in some cases, that’s not enough. If you’re having trouble with your wrists, a little extra warm-up before class could be just the thing you need. Try this out about 5 minutes before class starts and see if, over time, it helps!


    1. Make fists and roll the wrists clockwise and counterclockwise for 15-20 seconds in each direction. Do this once with the thumbs outside the fists and once with them inside.
    2. Open and close the hands quickly for 20-30 seconds, warming up the hand and forearm musculature.
    3. In Quadruped (all fours):
      •   Rock forward/back 5x and then side-to-side 5x. This range of motion should be pain-free, so you may not get the shoulders fully over the wrists to start. 
      •   Circle the shoulders around the wrists, 5x in each direction. Again, you might not be able to get the shoulders fully over the wrists to start.
      •   Repeat steps a & b with the fingers pointing out to the sides of your mat.  
      •   Flip the palms to face up, fingers pointing towards each other, and rock from side-to-side 5x, stretching the wrists into flexion. You will most likely have the majority of your weight in the hips and not over the wrists.


    Click on the link to our YouTube channel below, where you can see me perform a simple wrist warm-up. You can also find out how to modify your yoga practice if you’re suffering from acute wrist pain. From there, you can link my series on LYT Daily, “Weightless in the Wrists,” which includes six traditional LYT classes with little to no weight-bearing through the upper extremities, specifically for people with current pain and/or wrist dysfunction. Take care of your wrists so you can stay on your mat all year long!


  • Pre-Labor Preparation

    Pre-Labor Preparation

    Kristin-Williams-pregnant

    We happen to be in the midst of covering Pre- and Postnatal populations in our LYT Yoga Level 2 teacher training, which has me thinking of a whole other form of labor itself…the labor and delivery of babies! Having had three children of my own, I’ve been lucky enough to experience relatively uneventful labors. And while labor itself may not be the most fun, the end result is priceless. Looking back, I realize that I probably ignored what was right for my body both before and after delivery, in the pursuit of trying to feel “normal” and function like I always had. After listening to lectures given by our friend and fellow LYT instructor, Kristen Boccumini, I wish I’d been privy to her information while I was pregnant with my first 20 years ago today!

    Kristin-Williams-baby

    So much is happening during the nine to 10 months of pregnancy, particularly in the second and third trimesters. The abdominals get stretched, the rib cage flares, and the diaphragm changes shape to accommodate the growing uterus and baby within. The ligaments all over the body get lax to prepare the body for this expansion and future delivery of the baby. Finally, our posture changes dramatically to support the weight of the belly. And yet, if you were me, you tried to keep running well into your second trimester (or longer), paying no heed to the effect this might have later on. Is there something we can be doing to prepare the body for Labor Day? Yes, there is.


    According to Kristen, the first place to begin is with the breath and the posture. Both key components of LYT Yoga®, performing 360-degree breathwork and maintaining a neutral pelvis are integral to maintaining our connection to core, providing room for a growing baby, comfort in a growing body, and minimizing the risk of injury both pre- and post-delivery. Oftentimes, pregnant women will breathe only into the upper ribs, so the core musculature becomes dysfunctional and weak. The 360-degree breath, which includes breathing down into the lower lobes of the lungs and back body, helps to work the diaphragm down. This then helps fire the deep intrinsic core muscles clear down to the pelvic floor, getting it all to work in tandem and helping to prevent certain areas of the back from over-clenching. Maintaining good posture creates a balance and symmetry of the pelvis, which will, in turn, provide comfort for the pregnant mother, create space for the growing baby, and may increase the chances for better labor outcomes.


    So what are a couple of things to look for as your pregnancy progresses through each trimester and what can you avoid? During the first trimester, a lot is left up to the comfort of the mother. While there is no evidence that exercise of any type predisposes a person to a miscarriage, the first trimester is when the risk is highest so it is up to the discretion of the mother as to what feels right. Towards the end, lying on the belly may no longer be comfortable and should therefore be avoided. 


    During the second trimester, quadruped is the better option as opposed to anything on the belly, like cobra or locust. You should watch for doming of the abdomen during any type of lumbar flexion, whether it be ab curls or getting up from lying down. Doming of the abdomen is a sign of too much pressure across the linea alba, which is the long line of connective tissue between the abdominals. So if this occurs, back off the abdominal work and begin rolling to your side to come up from a lying position. A wider stance in forward folds may be more comfortable to accommodate for the belly. Avoid deep backbends, which we don’t promote in LYT Yoga® anyway, as the abdominals are already stretched and don’t need any help in this area! Twists may also become difficult due to the belly and may place undue stress on the abdominals as well, so keeping rotation to the upper thoracic spine is key.


    For the third trimester, continue the recommendations from the first and the second, but now we have to allow for the weight of the growing baby. So be careful with asymmetrical poses, which can put undue strain on the lower body ligaments. You’ll want to substitute with double leg postures and shorten the stance in order to keep the strain across the pelvis minimal and equal. During twists, a hand placed on the belly to keep it centered and encourage the twist from above is an option as well. Props such as the wall, blocks, bolsters, chairs, and blankets can be excellent ways to help modify your practice and keep you on your mat longer. 


    Finally, just remember mamas, LABOR IS UNPREDICTABLE. However, your baby arrives on your Labor Day, accept it with love. There should be no expectations with regards to labor, as a baby may have its own plans! So on this upcoming Labor Day holiday, celebrate our working classes and mamas alike. Feel free to check out either our Pre- or Post-Natal Series on LYT Daily for classes to help you through and past your own labor and delivery. Your body and your baby will thank you! Until then, I’ll see you on the mat!


    Xoxo,

    Kristin