Tag: motivation

  • How to Adapt Your Yoga or Movement Practice for Pregnancy – Volume 2

    How to Adapt Your Yoga or Movement Practice for Pregnancy – Volume 2

    by Kaitlin Acharya


    How to Adapt Your Yoga or Movement Practice for Pregnancy: Second Trimester

    Enjoy the extra energy, mindfully


    Welcome to my favorite trimester. Hopefully, by now many of the difficult first trimester symptoms have subsided and you feel a surge of energy. In my experience, it was more of a return to feeling like my usual self, which did mean more energy compared to the first trimester. If you toned down intensity during the first trimester because of fatigue, you may feel like you can turn things back up now, but don’t go too hard. Listening to your body is still very important.


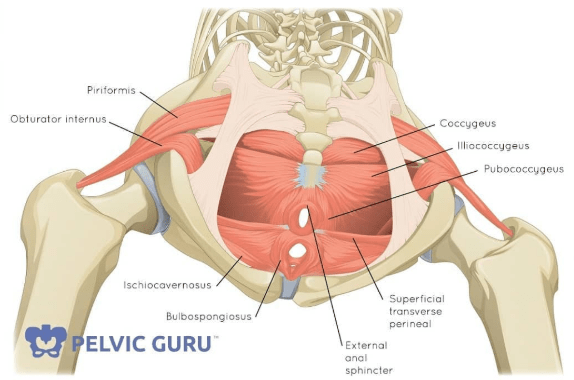
    Continue to work on connection to your core, but you will want to start modifying to avoid any movements where you cannot control the pressure within your abdominal cavity (also known as intra-abdominal pressure, or IAP). Pay attention to any soreness in the pelvic region or low back which can be indicators that you are pushing the intensity too hard and over-stressing your pelvic floor and core. Overhead movements, like pull-ups or shoulder press, can overload the ever-stretching abdominals at this point so keep an eye on your belly if performing these movements. Jumping and high-intensity cardio can have negative effects on joints and the pelvic floor so it’s a good idea to start modifying these types of movements as well. Crunches and sit-ups are also not advised, but that doesn’t mean you can’t work on core connection while lying on your back. Supine breathwork is a great way to connect to your pelvic floor and core without over-stressing the abdominals. It’s also a great way to train your focus for labor. Again, check out my blog post on this type of breathing.


    Kaitlin 1


    Mind the growing bump

    As your baby grows, so does your belly and you’ll start to show at some point this trimester depending on your body and whether you’ve had a baby before. Especially on the yoga mat, you will need to start modifying movements to accommodate the bump. Any position where you are lying on your belly may start to become uncomfortable, like cobra and locust. At this point, move to all fours and practice a similar movement like cat-cow or bird-dogs.


    Blocks are going to be your best friend. Use them to modify plank, down dog, and forward folds. They are also great for creating space around the belly in any sort of pose where you are bent over and have one or both hands on the floor – like fingertip lunge or side lunge. You can also widen your stance in any pose to create more space for the belly. Play around with the height of the blocks to find a position that is comfortable for you. This is also the time to be mindful of twisting. Gentle twists in the thoracic spine are ok but do not force the twist – something I don’t recommend to even my non-pregnant students. Placing a hand on the belly for abdominal support and to monitor any unmanaged IAP is also helpful. And of course, if they just don’t feel good, don’t do them!


    Mindset matters

    I realize much of this post is focused on what you can’t do or may have to limit as a pregnant person, but know that there is still so much that your body can do during this time! Personally, I felt myself being amazed and appreciative that my body was still able to move on my mat and lift weights all while growing a human inside of me. Sure, some poses looked a little different, I wasn’t doing any of my beloved handstands, and I had lowered my weights a bit but I was still moving and breathing and taking time to focus on myself and my body. Pregnancy is temporary. It may not feel that way by the time 36 weeks rolls around (me currently: have I been pregnant for 9 months or 9 years?!), but you will have your baby and with proper post-natal care you will be able to return to your regular movement practice.


    Kaitlin 2


    How to Adapt Your Yoga or Movement Practice for Pregnancy: Third Trimester

    The Final Countdown


    The last trimester – you’re almost there! This trimester can be fraught with discomfort as the belly grows even bigger and muscles and ligaments loosen even more thanks to that relaxin hormone. Fortunately, movement can help lessen pain and prepare for you for labor and delivery.


    Lighten the Load

    I like to think of movement intensity during pregnancy like a bell curve. You may lack energy during the first trimester, but slowly start to regain it and peak during second trimester. Then third trimester comes around and the body needs less of that intensity to prepare for birth. This doesn’t mean you should cease all movement, but as I advise throughout this series, listen to your body. Mine was screaming at me to slow down practically on the day that I hit the third trimester. My low back started hurting, walking up stairs left me a little winded, and even bending over was getting difficult. So I modified even more. At this point in my pregnancy my yoga practice was heavily modified, focused on connecting with my breath and staying mobile in my hips to help with labor. I was still getting my heart rate up during my weightlifting workouts, although weights were extremely light.


    Modify Daily Movements

    In addition to continuing to modify your movement practice as you did in the second trimester, it’s also important to consider modifying movements outside of your exercise regimen or yoga mat. If you haven’t already, start modifying how you sit up, whether from laying down on your mat, the sofa, or your bed. It’s best to roll to your side first and use more of your obliques to sit up so that you are not over-stressing the already stretched and stressed rectus and transverse abdominus muscles, as well as the linea alba, the midline connective tissue that holds your abdominals together.


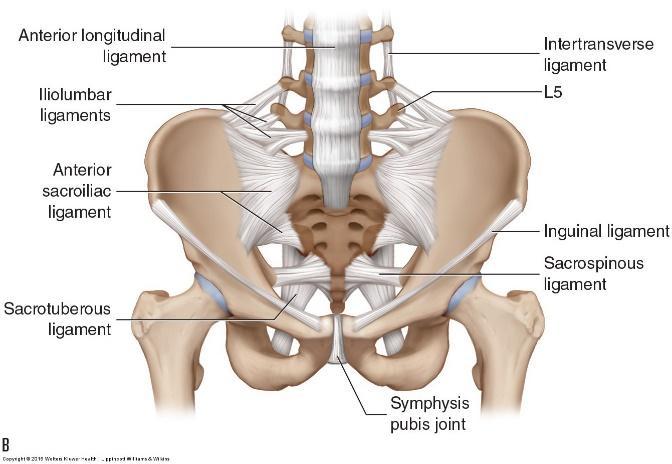
    Bending over may also have become more difficult. Try widening your stance, squatting instead of hinging at the hips to pick something up (bending more in the knees and lowering the butt towards the ground), and sitting down to put your shoes on…maybe even enlisting your partner or a friend to help with that last task 😆. Balancing can also become noticeably difficult during this trimester and maybe even painful in the pelvic area due to separation of the pubic symphysis or issues with the SI joint.* You can ease this pain by avoiding unilateral positions (anything that uses only one leg) or shortening your stance.


    *among other possibilities — the pelvis has a lot of muscles and ligaments attached to it! But these are most common in pregnancy.


    Kaitlin Acharya 2


    Movements to Help with Labor

    Every mama wants to know how to ease the arduous task of birthing a baby — I mean, who wouldn’t?! Here are some movements that can help prepare your body for labor.

    • Down Dog – Downward-facing dog is actually classified as an inversion since your head is below your heart in this pose and it is a great position to help relieve stress on the pelvis and even move the baby out of the pelvic outlet for repositioning. If your baby is in a breech position, this pose can help, but I also suggest checking out Spinning Babies and the Webster Technique for more professional help with getting the baby in a head-down position.
    • Cat/Cow with knees together, feet wide – This was one of my go-to movements in my third trimester. Keeping the knees together and feet wide internally rotates the hips and creates more space in the back of the pelvis, which at this point in pregnancy is probably holding a lot of tension from the load of the baby in front.
    • Squats, squats, and more squats – Squats are fantastic for opening the pelvis and preparing the perineum for childbirth. There are so many different varieties as well – goddess squat (legs wide, feet turned out), asymmetrical (one foot on a higher surface), the LYT happy squat (hips high, head down, arms forward – great for the low back), side lunges, and more.


    One Last Thing…

    My most important recommendation for labor – don’t forget to BREATHE!! Keep practicing that 360 degree-breath all the way through labor and beyond. It is truly going to be your best tool.


    Happy and healthy birthing!


    by LYT teacher Kaitlin Acharya

    Website: www.yogakaitlin.com

    Instagram: @yogakaitlin

  • Raspberry Lemon Tart

    Raspberry Lemon Tart

    Every year on March 14th, teachers, scientists, and those who just love math and numbers celebrate Pi Day, a special day that pays tribute to the mathematical constant Pi… otherwise known as the number 3.14 (plus a bunch of other digits that are really hard to memorize). We love any holiday where we can celebrate with pie, and we are sharing our favorite Vegan Raspberry Lemon Tart recipe to enjoy today or any day of the year!


    Raspberry Lemon Tart

  • Dizzy Lately? Is it Vertigo?

    Dizzy Lately? Is it Vertigo?

    by Sarah Kingsley


    Lately, I have seen an increase in those suffering from symptoms of vertigo or dizziness. Many have noticed vertigo and other neurological side effects post COVID vaccine or infection. There is a difference between “dizziness,” more of a lightheaded feeling which can be solely from dehydration, hunger, or change in blood pressure when changing positions too quickly, and “vertigo,” a sensation of the room spinning around you, which has more to do with your vestibular system.


    The more commonly known and treatable form of vertigo is “BPPV” Benign Peripheral Paroxysmal Vertigo which is experienced after a car accident or trauma involving an impact such as a fall, however, it can also come on for no reason at all, and some suffer from chronic recurrences of this type. This is the most treatable type of vertigo and can usually be cured from a maneuver or series of movements performed by a practitioner, or even by yourself. The trick is which ear canal is affected. Most often, the posterior canal is the culprit and the Epley’s or Canalith repositioning technique is used. You can figure out which side is affected by coming to a long sitting position on a bed (torso upright and legs extended in front of you), turning your head to the right, and abruptly throwing yourself onto your back. Whichever side symptoms occur, stay in this position for 30 seconds or until symptoms subside. Next, turn your head to the opposite side for another 30-45 seconds. Keeping your head turned in that direction, roll onto that side with your nose down towards the pillow for another 30-45 seconds. Bring your legs off the edge of the bed and press yourself up to a seated position. Stay there for 1-2 minutes. This can be repeated as needed and symptoms should decrease each time if this is your issue.


    The horizontal canal calls for “The BBQ Roll.” Deciding which ear is affected is the first step, and begin lying on that side for 30 seconds, then roll onto your back for another 30 seconds, then roll onto your opposite side for 30 seconds. Next, tuck your chin down slightly as you roll onto your belly and prop yourself up onto your elbows for 30 seconds. Finally, roll back onto the side you started for 30 seconds, and return to an upright sitting position. Some suggest trying to keep your neck and head neutral for 15 minutes following.


    Other forms of vertigo include a peripheral hypofunction – when one side is not working properly leading to symptoms due to overexcitement of the nonaffected side typically. For this type, and most other forms or reasons for symptoms of vertigo, 3 types of exercises are recommended. 


    Adaptation – Attempts to retrain and reconfigure your vestibular system. 

    Exercises include: holding a target about 6 inches in front of you as you try to keep your gaze on the target and turn your head from left to right or up and down. You can also take two targets arms length ahead beginning with your gaze in the center. Look with just your eyes to the right target, then keeping your gaze there, turn your head to face that target, then look with just your eyes to the left target, then turn your head to face the left target. Repeat left and right until dizziness occurs or you are unable to maintain the gaze on the targets. It is important for these eye exercises to be followed by an eyes-closed-and-covered 30-second rest to allow your system to rest and reset before trying another set or the next exercise.


    Substitution exercises attempt to substitute for the loss or malfunctioning side. 

    Begin with one target arms length ahead. Lock your gaze, then close your eyes and turn your head to the left, attempting to maintain your gaze on the target. Open your eyes to check, then close them again and turn your head to the right and open for your check. Repeat again for 1-2 minutes or until symptoms occur.


    Habituation – Repetitive exposure to a noxious stimulus or one that triggers symptoms, overtime promotes decreased symptoms. 

    Exercises include: turning your head left/right, up/down, laterally up/down to each side 10 or more times each with your eyes open and with your eyes closed. Movement in concurrence with these exercises works well. Walking while turning the head left/right, up/down, possibly adding eyes closed, or keeping a gaze on a target, or a patterned surface that can often trigger symptoms. These exercises when coupled with balance training such as bringing feet together, tandem stance, or standing on a foam/pillow surface or rocker board also further stimulate the vestibular system. Again, it is important to wean into these exercises and not progress too much too fast, thus overloading the system.

  • Let’s Talk Pelvis

    Let’s Talk Pelvis

    by Michelle F. Onion, PT, MSPT

    pelvis1

    Why is talking about the pelvis so important? Because it is our base, our center. Our trunk “rests” on it and our legs come out from it. When it is not in an ideal position it can impact how we move and the ease with which we move. 


    Let’s first talk about the bones of the pelvis. The largest bones are the ilium. There are two, one on each side. In the back, the ilium attaches to the sacrum. As the pelvis comes around you have the pubis bones on the top and they attach at the front at the pubic symphysis. At the bottom, the ischium attaches to the pubis and creates the obturator foramen (the large hole that sits between the bones). The ischium is angled lateral and anterior. It, in conjunction with the ilium and pubis, forms the acetabulum (hip joint). The inferior or posterior position of this acetabulum is determined by a posterior or anterior pelvic tilt, but there is a slight inferior orientation to it in neutral. The ilium, ischium, and pubis move as one but remember there are two sides. They can move in and out relative to neutral, rotate forward and backward, and slide up or down. This is a slight movement but movement nonetheless, that can impact muscular function altering both ease of motion and which muscles do the primary work. 


    There are multiple ligaments in the pelvis, spine, and hips that help to control and support. They are our enforcers. Bones are not stable in and of themselves but work in conjunction with muscles and ligaments to create stability. 

    Notice how the muscles and ligaments fill in the foramen (holes) of the pelvis. They act as a sling to support all that sits in the pelvic and abdominal cavities. They are a support system and they are crucial in keeping everything contained. This is our pelvic floor. 


    What I want you to notice from these two pictures of the muscles is how the pelvis connects the lower body, trunk and ultimately the upper body. Here you have the muscular connections. You can start to get an appreciation of how movement in the legs impacts what happens in the abdominals, glutes and vice versa. Small movements within the pelvis can allow the muscles in each of these regions to operate optimally or suboptimally.


    And then we have the addition of fascia. Fascia is the support structure that has just recently been given more attention. Think of fascia like plastic wrap. There is a strength and pliability to it. If you take a piece of plastic wrap and pull at one end of it, there is a far-reaching ripple effect impacting the entire piece of wrap. And fascia is everywhere and a big connecter of the lower and upper body. Small nuances in the pelvis can impact how the fascia moves. If it pulls or if it is more fluid, if it allows or prohibits movement.


    Let’s think about how this applies to yoga and our daily lives. If the pelvis lives in an anterior or posterior pelvic tilt, muscles will be at a disadvantage and unable to work as well for you or for your clients. Our core will not be able to engage fully. Our glutes will snooze even more. Our pelvic floor will have difficulty supporting all that depends on it for structure. And this has a huge impact on our movement and functional capabilities.


    If you look at the lower body. Our femurs will not be able to move well in the acetabulum (hip joint) and we will potentially have impingement and pain changing our movement patterns even more. As our hips move in this altered manner it impacts the ability for our knees to function which, in turn, impacts what our feet do. It is a complementary system. You lose optimal movement in one area and the other areas are impacted. We will lose the possibility of overall optimal movement. 


    Looking at the upper body. The structure and position of the trunk impacts the pull on the scapula impacting the stability and mobility of how the scapula move with shoulder motion. The scapula and humerus have a rhythm that allows for or takes away from good movement patterning. The difference with the upper extremity and lower extremity is that the upper extremity is not fixed to the ground so the impact on the elbow, wrist and hand may not be as noticeable, but there is still an impact. 


    And this all comes from our center, our pelvis. It is why LYT focuses on a neutral pelvis, not to make things difficult, but to allow our body to have access to optimal movement patterns. To be dynamic in our everyday. If your clients have difficulty with finding neutral, think about the other ways a pelvis may move: in/out; up or down. There might be a dysfunction there and physical therapy may address this. Perhaps helped with a joint mobilization or muscle energy technique that a PT can perform. And then the neutrality can be supported through our practice of LYT. 


    As you take time to consider the pelvis, think about how this impacts your individual function. Get to know its impact on your own movement, on your own function, and take this exploration to your clients and to others around you. We have the gift of guiding others through their own exploration of their individual movement. Helping others find their center, their base. Creating structure to allow for more optimal, dynamic movement. Enjoy the exploration! 


  • Feedback Friday with Janick Pic

    Feedback Friday with Janick Pic


    Today’s Feedback Friday is featuring Janick.

    She is a LYT-certified teacher and has an amazingly strong practice but I offered a few tips for her that I see as habitual pain points for other students as well.

    In LYT yoga, we reference the “triple S”, which is the alignment of the skull, scapulae, and sacrum, an alignment that is key for creating a neutral pelvis and spine for more optimal movement. Janick has some residual tension in her neck, indicating she has had struggles with a forward head position.

    Almost everyone I work with has a similar struggle because the forward head posture is its own epidemic in our modern-day lifestyle! The forward head occurs when the skull slides forward of its resting position on the first cervical vertebra, leading to increased tension in the neck muscles and often summoning the pelvis to tip forward as well. As the head protrudes forward of its optimal alignment, the shoulders will often round, but when the arms come overhead, the ribs tend to thrust forward to aid the movement of the shoulders.

    In Janick’s demo, I spotted that her head is a bit off-center with increased tightness in the neck and the impulse to thrust her ribs, even though she manages this old pattern quite well. It shows up in her modified side plank, where there seems to be a struggle between head placement and scapulae position on the thorax, resulting in the “look” of a hyperextended elbow in the bottom arm. My suggestion was to hold her head like she is holding an apple between the chin and throat to help maintain a neutral neck position.

    In Janick’s handstand, her ribs are slightly protruding due to this pattern of over lifting the head and chin and pushing the ribs forward. This residual movement pattern makes the ribs want to go forward with the head.

    In dolphin pose, I recommended holding the front ribs in to more effectively transition into her forearm balance, while actively drawing the bottom of the ribs down to the pelvis. This control of the thoracopelvic cylinder will come with more practice and extra attention to the neck position.

    These small tweaks will help her garner more stability in the center. For Janick and everyone: remember how important the alignment of the “Triple S” is in all of the movement as well as in daily life and work on getting the skull balanced on the top of the spine!


    Submit your own video for Feedback Fridays here!

  • Is it normal to pee when you jump?

    Is it normal to pee when you jump?

    by Magdalen Link


    I remember in college when I was competitively cheerleading it was a joke among my friends that sometimes we peed a little when we tumbled. A roundoff backhandspring on a hard basketball court puts a lot of pressure on the pelvic floor–but little did I know back then. I have seen this same joke play out in different ways–moms crossing their legs when they sneeze, looking at their kids saying “you did this to me!” And clinically I see it time and time again. “Do you leak when you cough sneeze or jump” I ask. “Oh yes, but I’ve had 3 kids so…


    Stress urinary incontinence is leaking (a little or a lot) of urine with any activity that increases the pressure in your abdominal cavity such as sneezing, coughing, laughing, jumping, running ect. It is very common–up to 30% of women experience stress urinary incontinence–but it is not normal. There are many factors that can contribute to the development of symptoms. Some include poor coordination, strength or relaxation of pelvic floor muscles, damage to the pubocervical connective tissue, urethral hypermobility, ect. During pregnancy your pelvic floor has not only the job of holding all your internal organs but also holding a baby. This is hard work and can lead to stretching of pelvic fascia and weakness of the pelvic floor muscles. Childbirth, particularly where forceps are needed can lead to stress urinary incontinence from damage to the pelvic floor. Chronic coughing, straining when having a bowel movement, or excessive weight gain can also lead to SUI. 


    What to do about it?

    The good news is–most of the time it is treatable! First line of treatment is conservative management which includes lifestyle changes, pelvic floor physical therapy and/or pessaries. In pelvic floor physical therapy, treatment may include pelvic floor muscle strengthening, relaxation, coordination training, optimizing your body’s ability to manage pressure, and strengthening surrounding musculature. Sometimes the pelvic floor needs a bit of internal support in the form of a pessary. A pessary is a small device that fits into the vagina to help support a prolapse of the uterus, bladder and/or rectum. If all else fails, surgery may be an option for you. 


    It is important to normalize talking about pelvic floor health so the high percentage of people who have pelvic floor dysfunction can get the treatment they deserve. So the next time you hear someone joking about their stress urinary incontinence tell them a pelvic PT can help! 


    If you want to learn more about your pelvic floor follow me on:

    Instagram & TikTok @Magdalenlink_dpt 


    Xoxo-

    Magdalen 

  • Four Steps to Heal Your Tendinopathy

    Four Steps to Heal Your Tendinopathy

    by Thalia Wynne


    Tendons are wonderful structures of dense connective tissue, largely composed of collagen, that help connect muscle to bone. Its job is to help transfer force from muscle to bone. When tendons lengthen, they store energy that then gets released through a stretch-shortening cycle. This is that springy feeling you might feel when you load up for a big jump. Tendons allow us to be adaptable in movement. 


    achilles tendon


    What is tendinopathy? Tendinopathy is an injury to the tendon or paratendon (the outer casing of a tendon) that is aggravated by mechanical loading which results in a tendon being less capable of sustaining repetitive tensile loading. It’s categorized as an overuse injury. The primary cause of tendinopathy is excessive load beyond the tendon’s usual capacity. Imagine you are carrying one grocery bag into your house, which you’ve done many times before. You decide to host a big party tonight and now suddenly you carry 50 bags at one time into your home. You get it done, but the unaccustomed stress aka the sudden increase in number of bags has left you sore and tired. You decide to do the same thing the next day, and the next day. You’ve now chronically overloaded yourself past your usual ability and are in a large amount of pain because of it. In this scenario, you are a tendon, and the 50 grocery bags represent excessive load. This type of experience is what leads to tendinopathy. This can happen from a sudden increase in training, a major change in training, or participating in an activity without any prior experience in that activity. Tendinopathy is a reactive inflammatory process that can lead to permanent degeneration if not checked. 


    It can be a simple injury to treat, and many people have pain relief with conservative management. Treatment includes pain management, progressive mechanical loading, biomechanics optimization, and a graded return to activity. A great place to start if you are experiencing tendon-related pain is to find local physical therapist to coach you through a unique treatment strategy for you. In general, here is an outline of what you might expect. 

    1. Pain reduction and load management 
      1. This stage includes use of isometric exercises to heal the tendon and avoiding positions of compression or aggravation.
      2. Patellar tendon example: 60 second (non-painful) wall sit 5x with a 1–2 minute rest between reps and avoiding deep squats and plyometric activity.
    2. Transition into heavy resistant training 
      1. This phase is important because it helps rebuild the capacity of the previously injured tendon. If we use our shopping example, you are training to handle those 50 grocery bags on a regular basis in this phase.  
      2. Patellar tendon example: heavy weighted goblet squat progressing from 15 to 6 reps over time for 3-5 sets, increasing weight over time. 
      3. Please note that this phase only works if the mechanics of the movement performed are not compromising the structural integrity of the tendon. This is where a LYT yoga practice would come in handy! LYT yoga teaches smarter, safer movement patterns that teach us to be more conscious in the way we load our bodies. This makes for some happy tendons ☺. 
    3. Plyometric training 
      1. This phase is where we increase the volume and intensity placed on the tendon to retrain tendon adaptability and refine the stretch-reflex response tendons were made to do!  
      2. Patellar tendon example: adding jumps and hops into your daily LYT practice. 
    4. Return to activity 
      1. Now we put the tendon to the test in a graded return to activity program specifically laid out to also include the previous phases for tendon health maintenance while returning to the desired activity. 
      2. Patellar tendon example: a walk:run return to run progression 2 days per week, heavy strength training 2 days per week, 1 total rest day, isometric exercises as needed, and a regular yoga practice to continue building better movement habits. 


    Tendons are great structures in our bodies that allow us to be adaptable in our movement patterns when trained appropriately. They are easily made grouchy when care is not taken to load them appropriately. This includes chronically underloading them! It’s a principle as old as time. Tissue responds to the demand that is placed on it. If we are not regularly placing an adequate load on these important structures of our body, we lose the adaptability that makes the human experience more enjoyable. Don’t we all want to maintain the ability to play with the dog, run with our kids, and dance just for the fun of it? Following the principles of tendon health explained in this article will help us do just that ultimately so we can live long, pain-free lives with better movement and happy tendons. 


    Happy movement and love always, 

    Thalia Wynne, PT, DPT, AT

    @thalialovee 


    Sources: 

    Image: https://aidmyachilles.com/achilles-tendonitis-injury/achilles-tendon-anatomy-function.php 

  • Upper Extremity Nerve Glides

    Upper Extremity Nerve Glides

    If you’ve ever heard me talk about nerves, I like to describe them as telephone wires. I visualize how these wires have a decent amount of slack on them as they traverse from pole to pole, transmitting countless conversations along the way. I will see birds come to perch and wonder if there’s a breaking point to where the slack needed to transmit the electrical impulse is no longer available due to the weight of the birds along the way. The nerves in our bodies can be visualized in much the same way. They need freedom to move and glide, with enough just slack to allow the neural impulses to travel from the brain to the body and back. It’s not uncommon to have areas of impingement along these nerves, which can cause a whole host of issues including sensory changes, weakness, and pain. I imagine those areas of impingement as birds sitting on that wire, taking up slack and causing tension. These “birds” can be anything from disc bulges, bone spurs, tight muscles, poor posture, to restricted soft tissues, etc. It’s my job as a physical therapist to remove as many of these birds from the wire, especially if they’re causing pain. 


    A common place people will experience nerve impingement symptoms is in the neck and arms. We have a bundle of nerves coming from our neck into our upper extremities called the brachial plexus, which exits the neck and splits into five nerve branches in the arm: the axillary, musculocutaneous, median, radial, and ulnar nerves. For the purposes of this PT Corner, we are just going to discuss the median, radial, and ulnar nerves, as these are the nerves we most commonly treat when it comes to nerve impingement syndromes. 


    The median nerve runs down the inside of the arm and through the center of the forearm and wrist. It is probably the most well-known of the three, as when it is impinged, people may develop something called carpal tunnel syndrome. The median nerve provides sensation to the palm of the hand, palm side of the thumb, index, middle, and half of the ring finger, and ends of the back side of the thumb, index, middle, and half of the ring finger. It innervates the muscles that pronate the forearm, flex the wrist and fingers, and abduct the hand. 


    The radial nerve runs more along the back of the arm before wrapping around the thumb side of the forearm to the thumb side of the hand. It provides sensation to the posterolateral upper arm, the posterolateral forearm, lateral side of the base of the thumb, and thumb side half of the back of the hand, and back side of the thumb, index and half of the middle finger. It innervates the muscles that flex and extend the elbow, supinate the forearm, extend the wrist and fingers, and move the thumb. 


    Finally, the ulnar nerve runs along the inside of the arm, inside of the elbow, and down the pinky side of the forearm to the pinky side of the hand. It’s the nerve you feel when you hit your “funny bone”. The ulnar nerve provides sensation to the pinky side of the hand, front and back, including the entire pinky and half of the ring finger. It innervates the muscles that flex the wrist and fingers, move the pinky, and adduct the thumb.


    Nerve gliding or mobilizing is one way to take “a bird off the wire”, by restoring homeostasis in and around a nerve. It is believed to decrease pain caused by entrapment of a nerve by encouraging movement between nerves and their surrounding structures. These nerve glides can be manual techniques performed by a healthcare professional on a patient or by the patient themselves. Studies have shown that mobilizing a nerve can decrease edema (swelling) and improve fluid dispersion within a nervous structure, reduce pain, and reverse the increased immune responses following a nerve injury. When mobilizing a nerve, you do not want to irritate or stretch the nerve. Just imagine that you are flossing the nerve along the path it follows from the head to the arm, freeing up any areas of entrapment. Here are some simple beginner nerve glide exercises for the upper extremities, which can be done on your own:


    • Median Nerve Glide – begin with your arm at your side, palm facing forward; you can place the opposite hand on the space between your neck and shoulder as an anchor; slowly flex and extend your wrist. Repeat 10-20 times.
    • Radial Nerve Glide – begin with your arm at your side, palm facing back; you can place the opposite hand on the space between your neck and shoulder as an anchor; extend the arm slightly behind you; slowly flex and extend your wrist. Repeat 10-20 times.
    • Ulnar Nerve Glide – extend your arm out to the side with the elbow bent to 90 degrees and your palm facing your face; you can place the opposite hand on the space between your neck and shoulder as an anchor; slowly flex and extend your wrist. Repeat 10-20 times.


    You can find a demonstration of these glides and some more advanced versions on our YouTube channel by clicking the link below! As always, seek the help of a physical therapist or other healthcare professional if symptoms progress or do not improve. Let’s keep those nerves moving and grooving so I can keep seeing you on the mat! 


    Xoxo,

    Kristin